BTC-Only- How to Create a 2/3 Native Segwit Multisig Wallet on Blue Wallet
Keystone Wallet's V1.1.0-BTC and later single-coin firmware versions support PSBT multi-signature functionality and are compatible with Blue Wallet V6.6.2 and later versions. This guide details how to use Blue Wallet, Keystone, and Coldcard as two of the multi-signature participants to create a 2/3 multi-signature wallet and how to send multi-signature transactions. In this tutorial, BlueWallet serves as both a watching wallet and one of the multi-signature participants.
Preparation:
- Check Battery: Ensure your Keystone wallet has at least 20% battery.
- Install and run BlueWallet V6.6.2 or later on your phone, Blue Wallet as the first multi-signature participant 1/3.
- Upgrade Keystone wallet to V1.1.0 (BTC-Only) or later BTC-Only firmware version, as the second multi-signature participant 2/3.
- Upgrade Coldcard firmware version to V2.1.0 or later, as the third multi-signature participant 3/3.
- Log in to iCloud Drive on your computer or phone. Tip: If you are using an Android system, you can log in to other cloud storage apps such as Google Drive. However, we recommend saving documents to the local folder of your mobile device and transferring them using a data cable, which is safer.
- MicroSD card(≤512GB; Default FAT32 format).
Step One: Collect the Keystone's Extended Public Key and Show the QR Code.
Click the icon button on the top left of the page > enter [Wallet Profile] > click [Show/Export Extended Public Key] > click [Multisig Wallet] to display the QR code.

Step Two:Collect Coldcard's Extended Public Key and Export to microSD Card
Insert the micro SD memory card into the Coldcard device.
Navigate to [Settings] > [Multisig Wallets] > [Export XPUB].

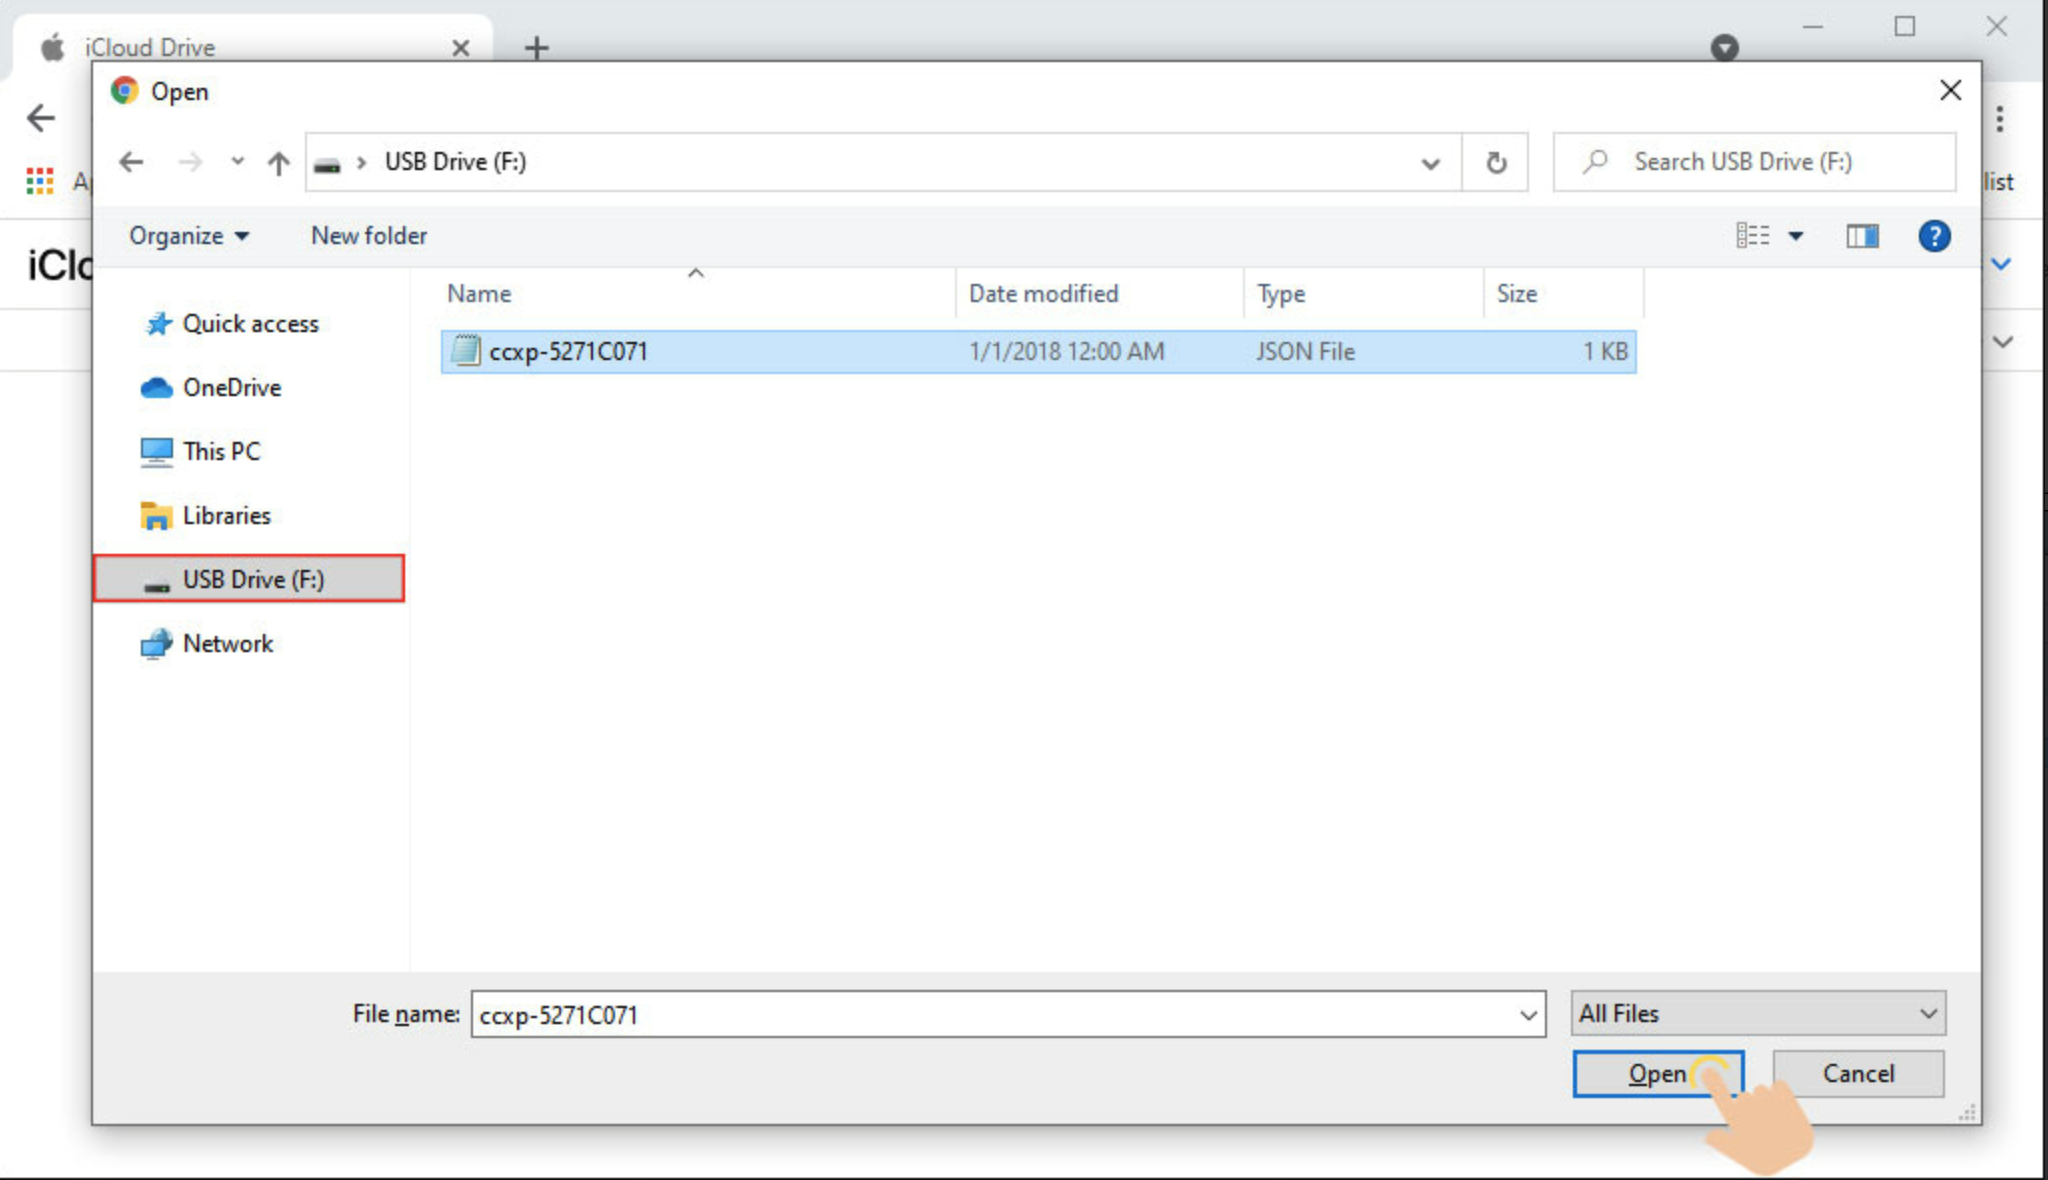
Press (√) to save Coldcard's XPUB document (e.g., xxcp-5271C071.json) to the micro SD memory card.
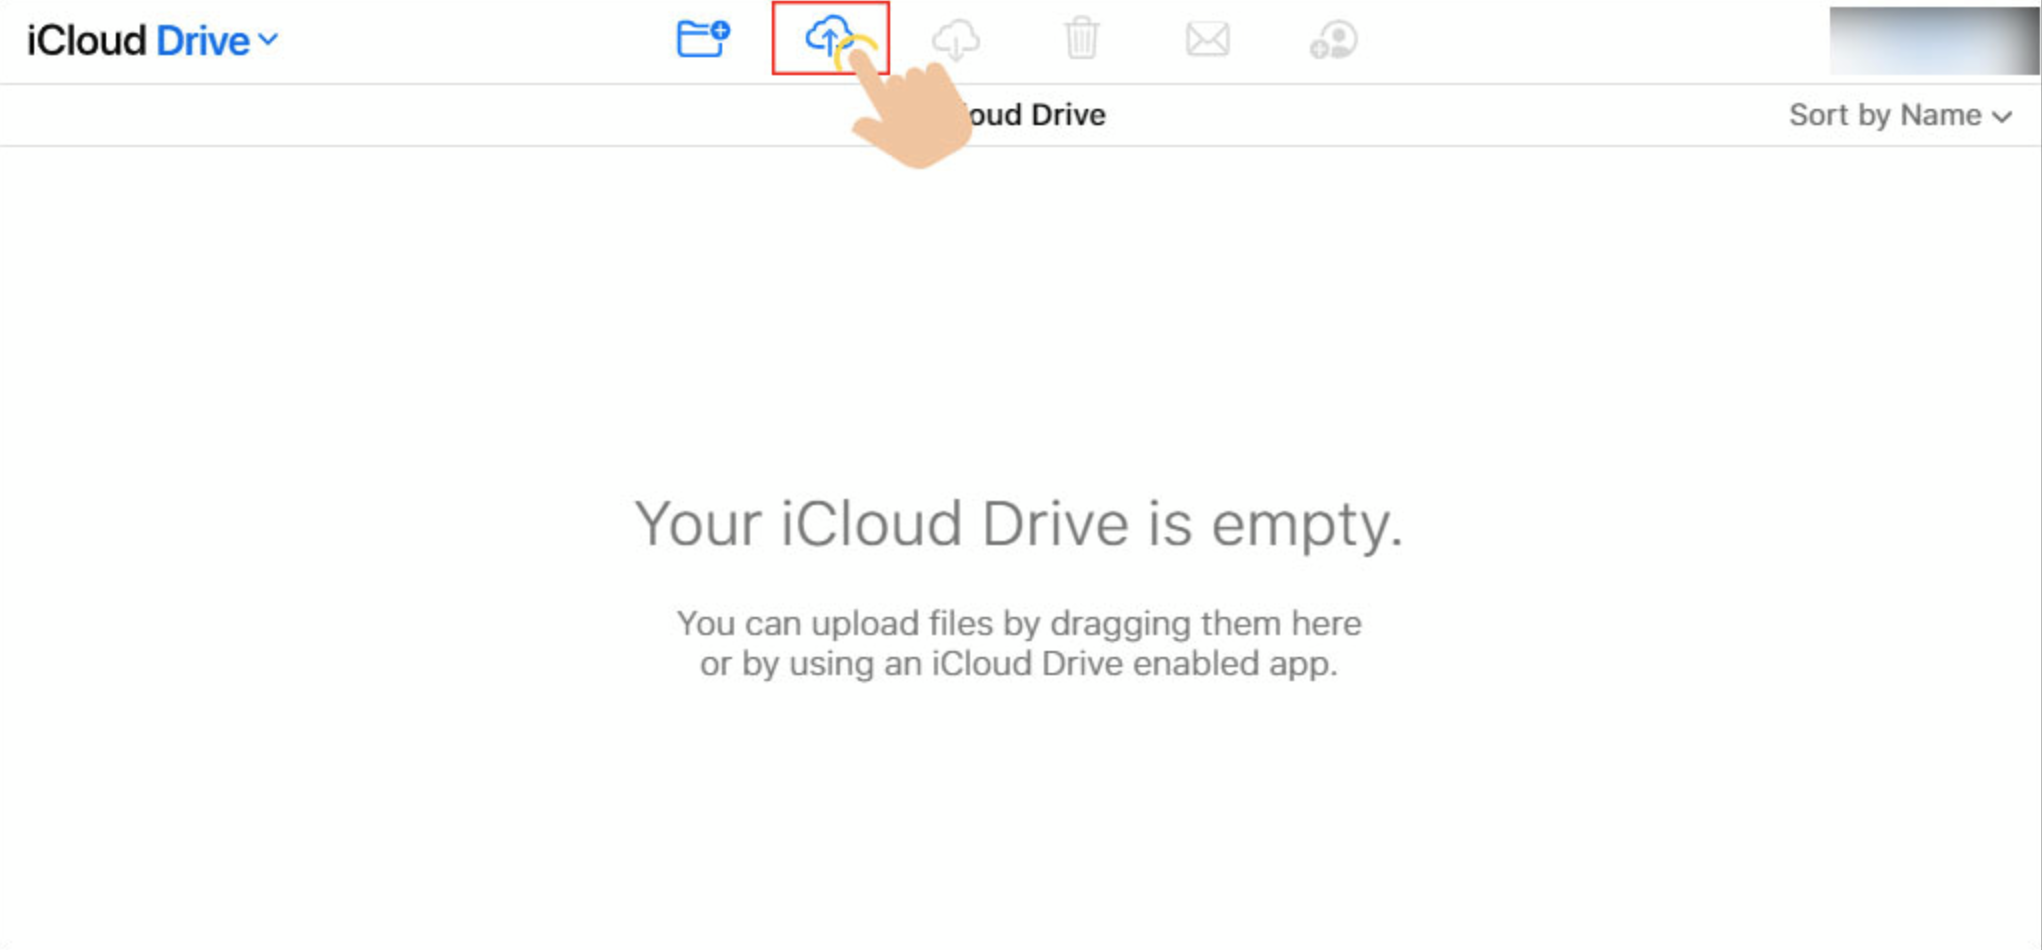
Remove the microSD card from Coldcard and insert it into the computer.
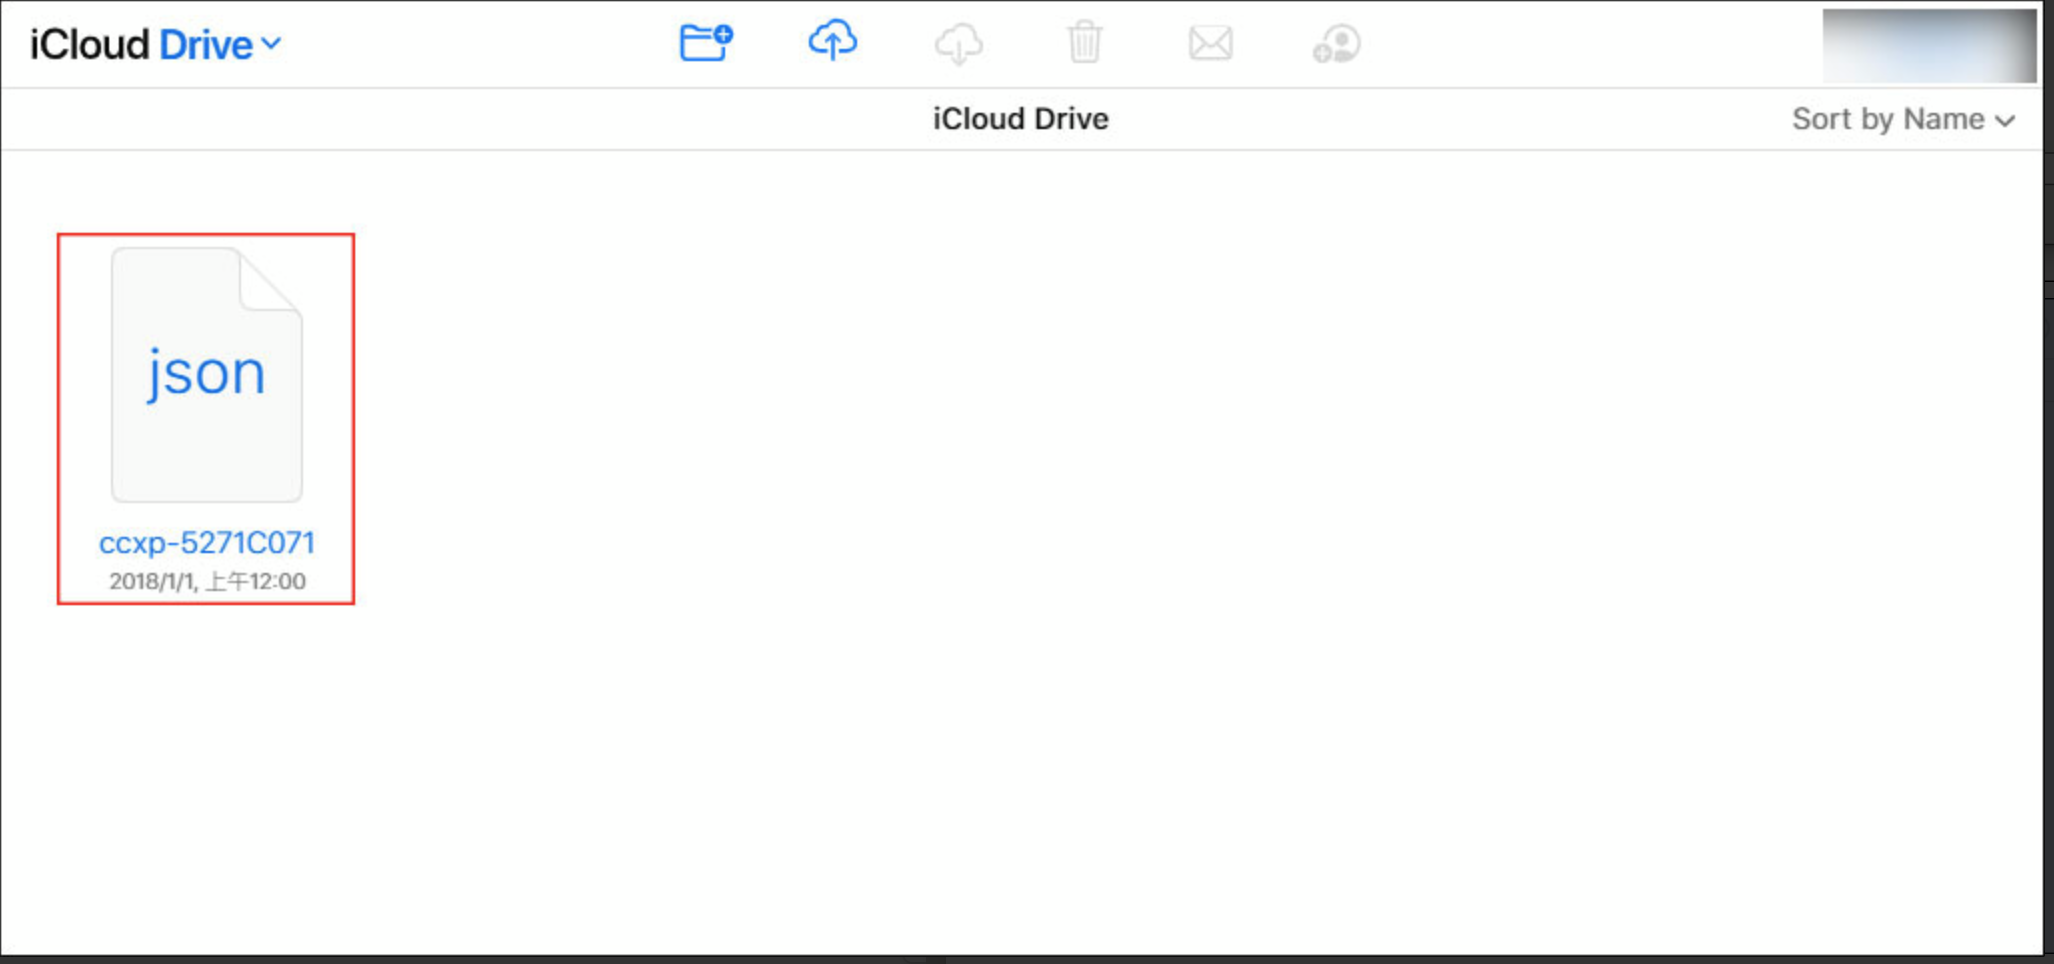
On the computer, log in to iCloud Drive, click the "Upload" icon, and upload Coldcard's extended public key document (e.g., ccxp-5271C071.json) to iCloud Drive.
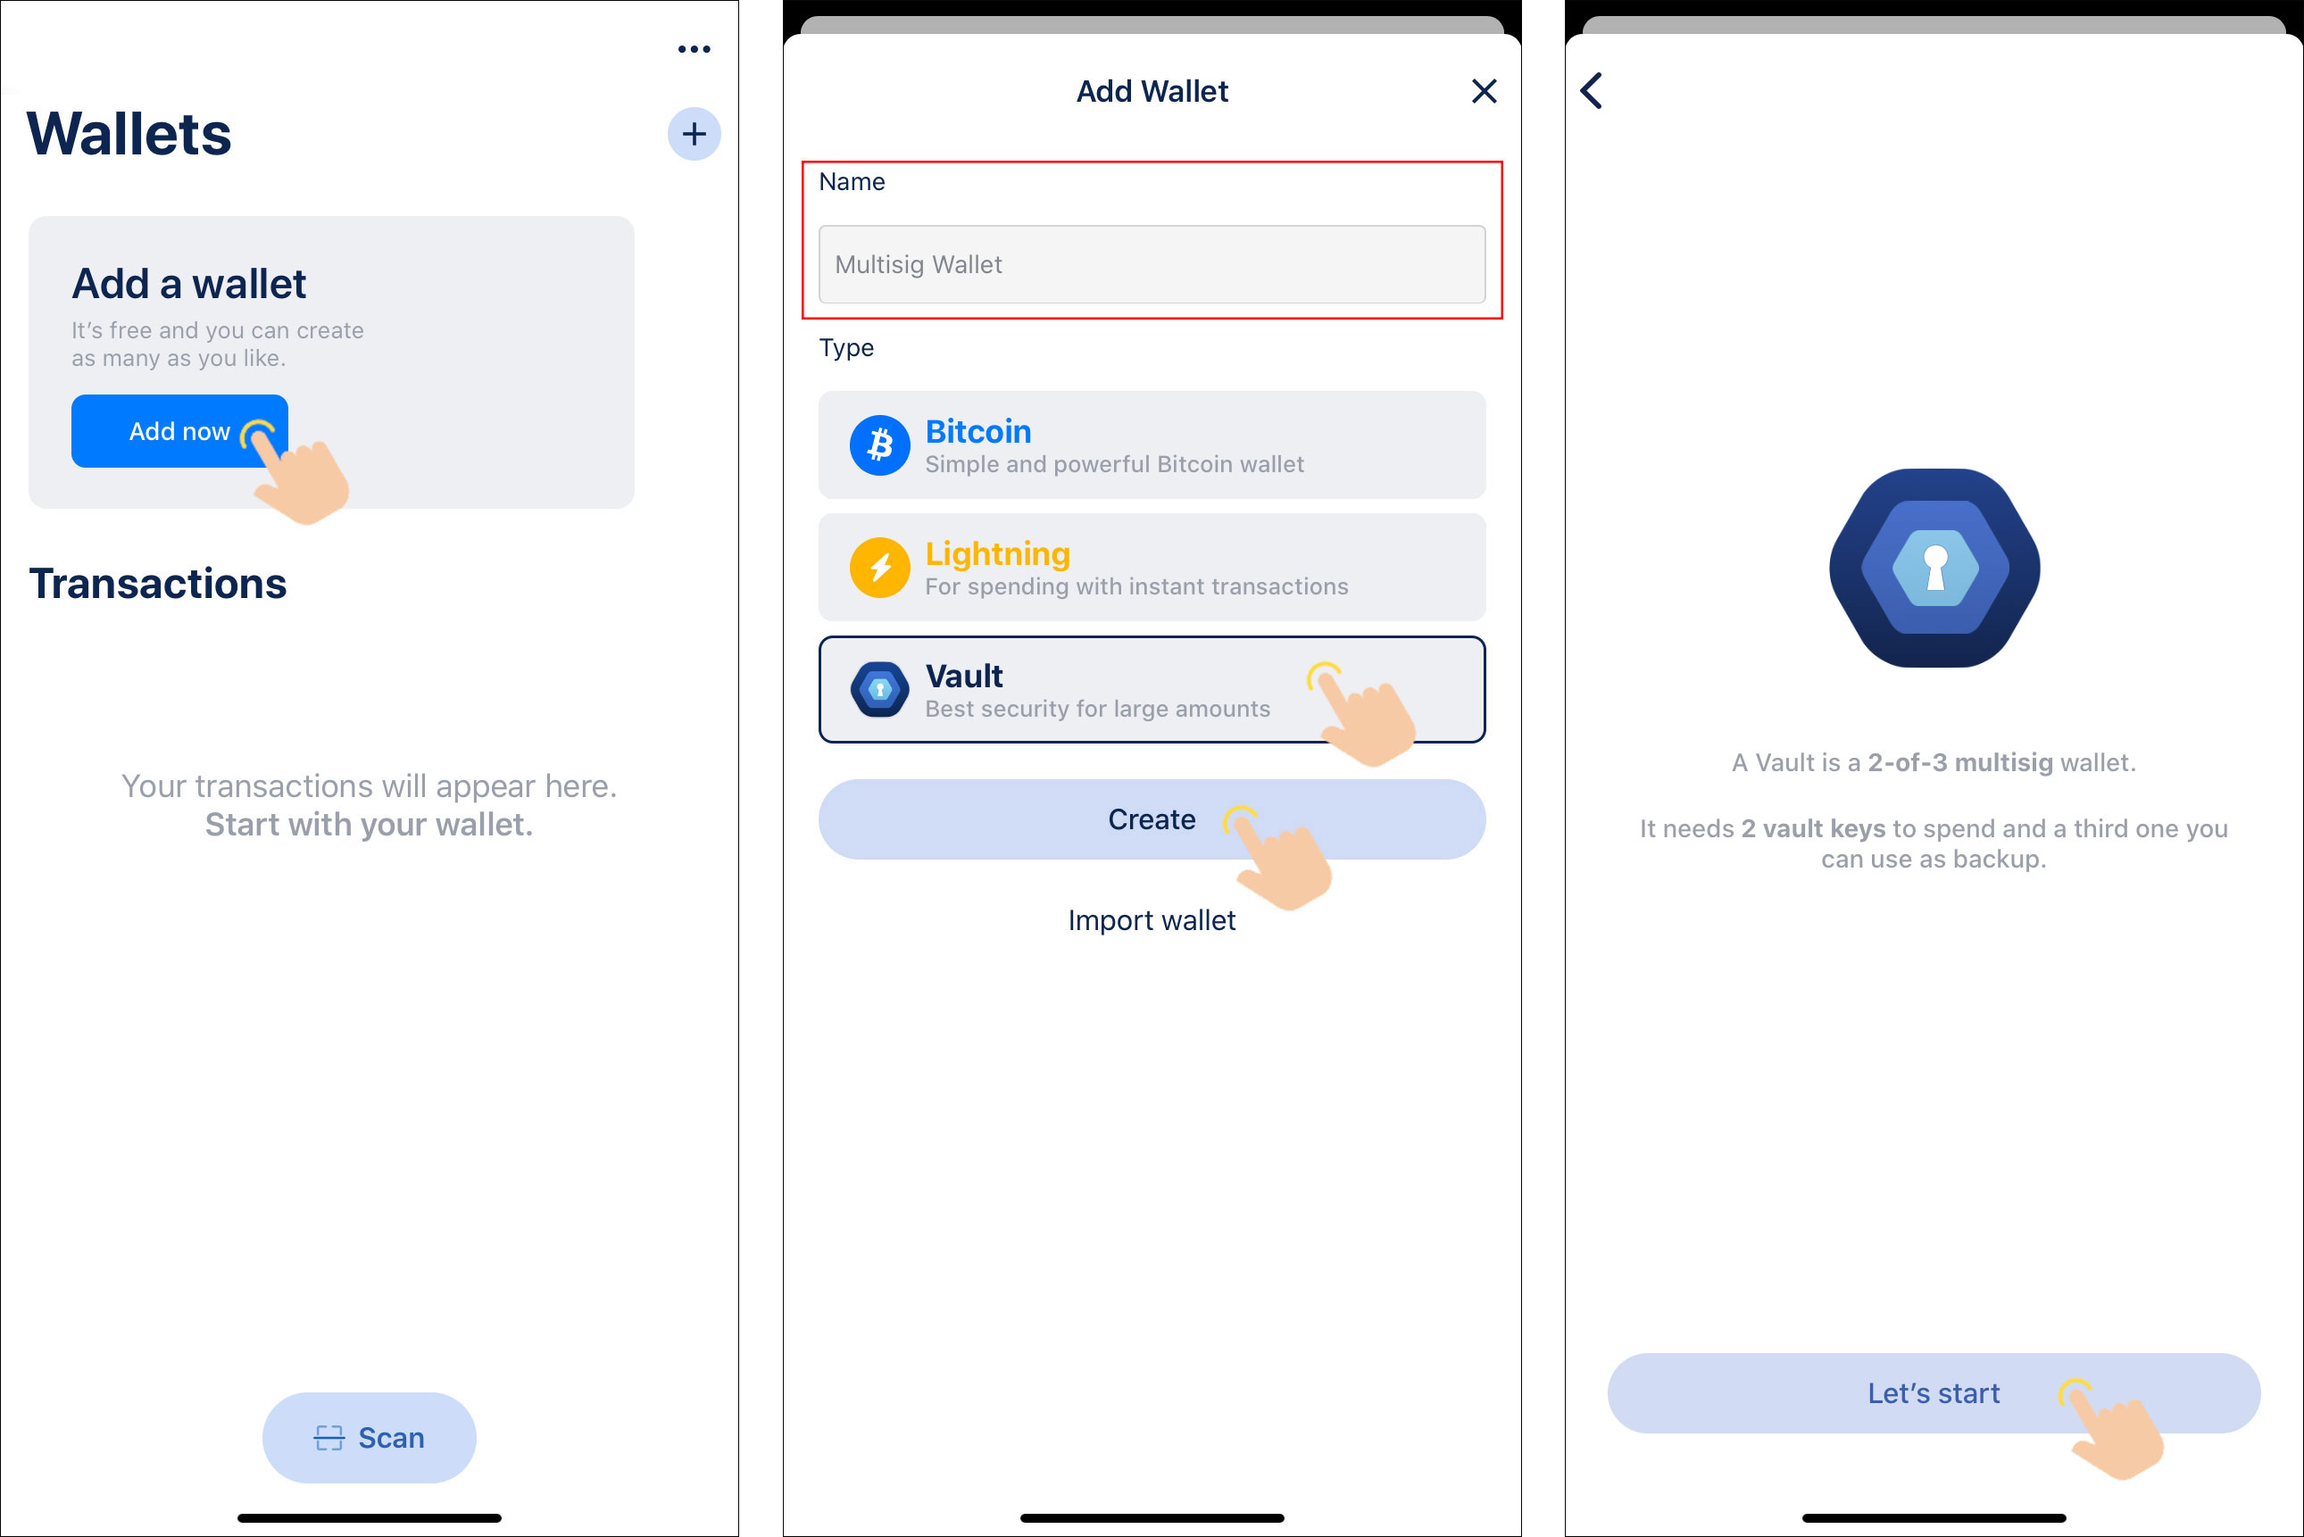
Step Three:Create a 2/3 Multisig Wallet on BlueWallet
Launch the BlueWallet app on your phone.
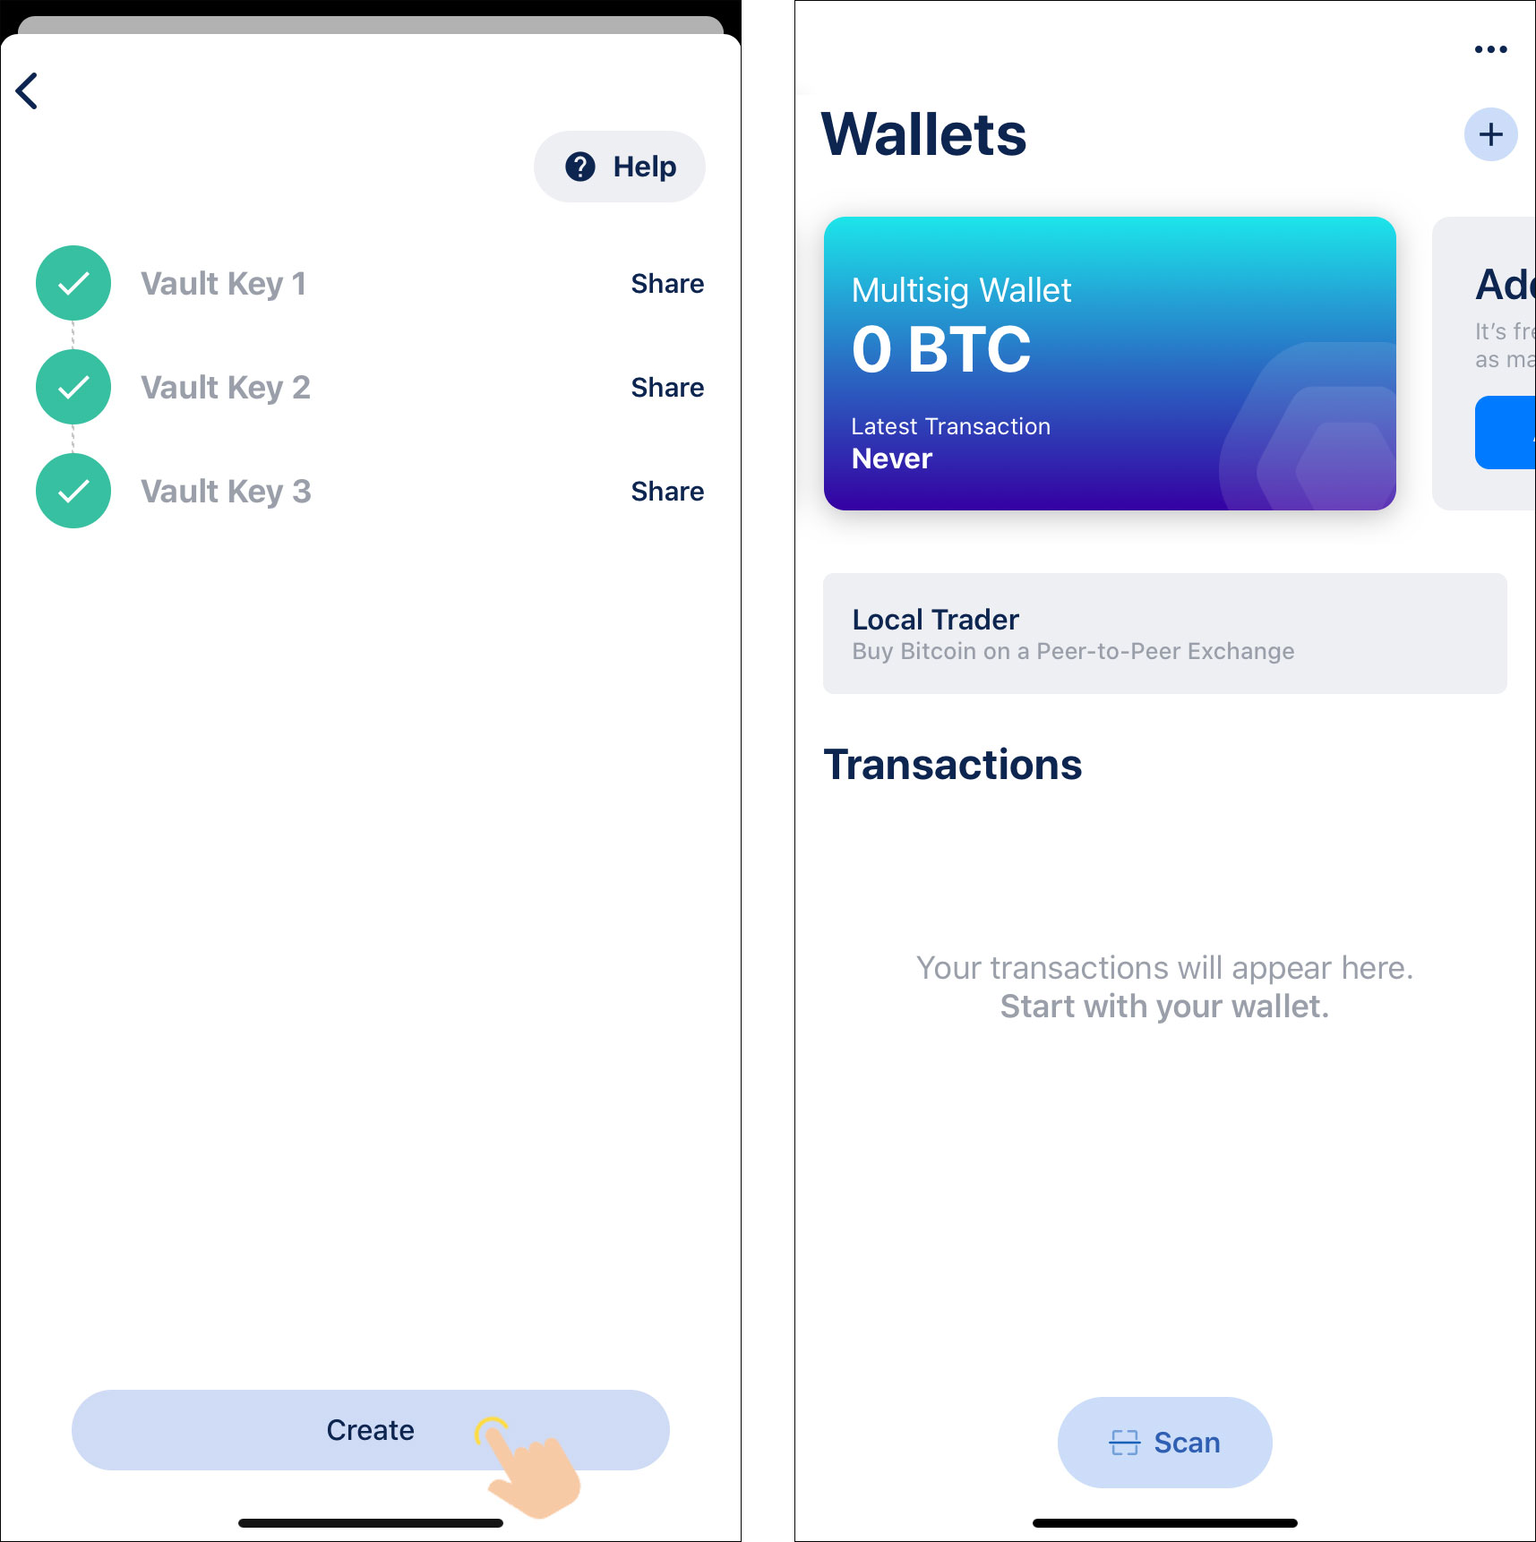
Click [Add Wallet] > Set a new wallet name > [Vault] > [Create] > [Get Started], enter the import multi-signature key page.
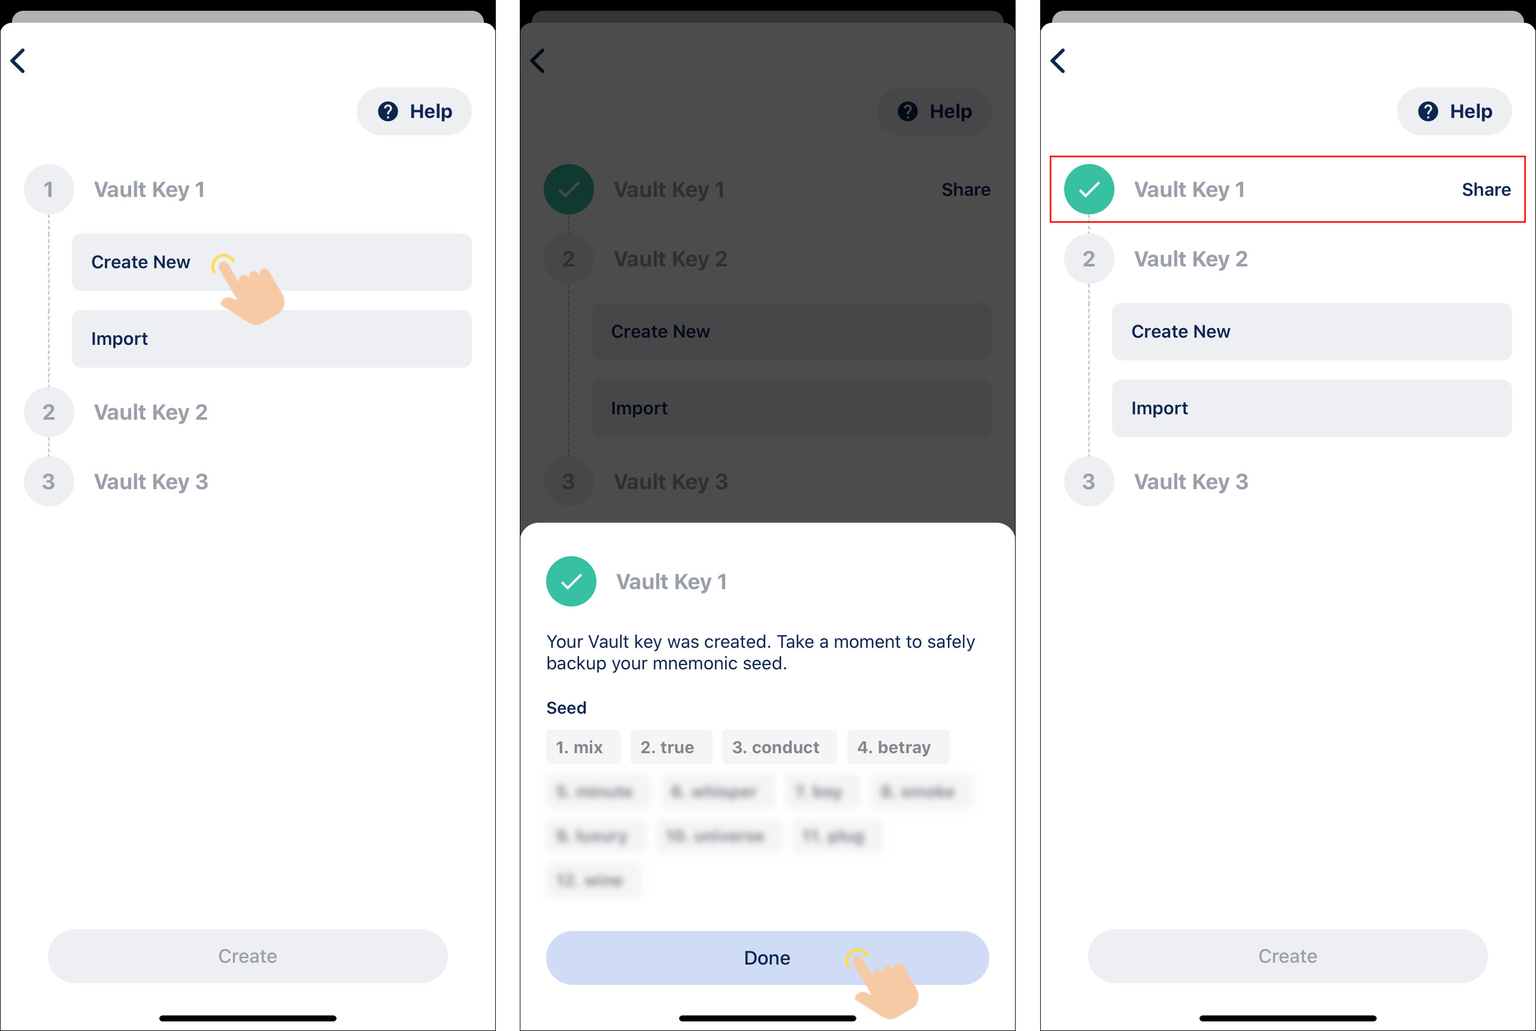
Click "Create new" under "Vault Key 1" > Securely back up the seed phrase and click [Done]. At this point, "Vault Key 1" has been automatically added by BlueWallet.
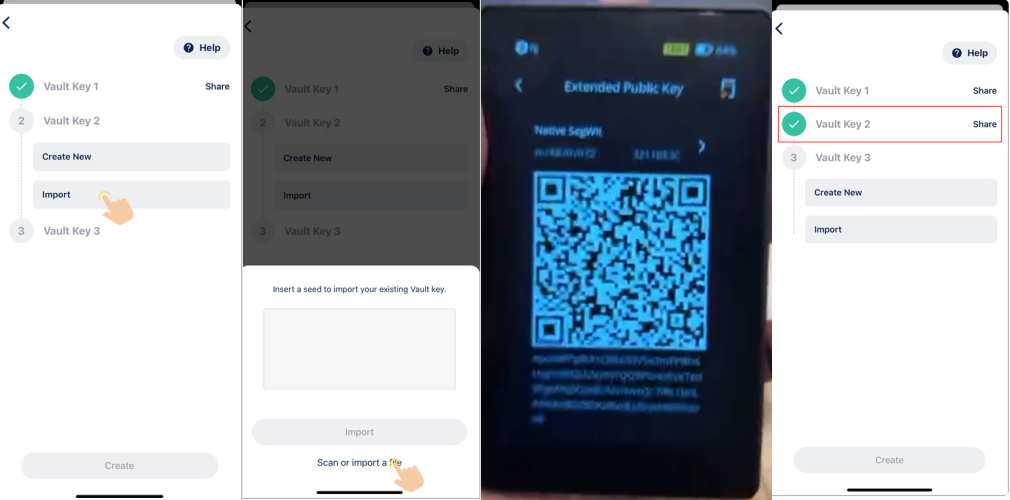
Click [Import] under "Vault Key 2" > [Scan or Import a Document] > open the camera and scan the QR code displayed by the Keystone wallet, enter the MFP next to the second address path, select the address path as (m/48'/0'/0'/2'). At this point, Keystone is imported as "Vault Key 2".
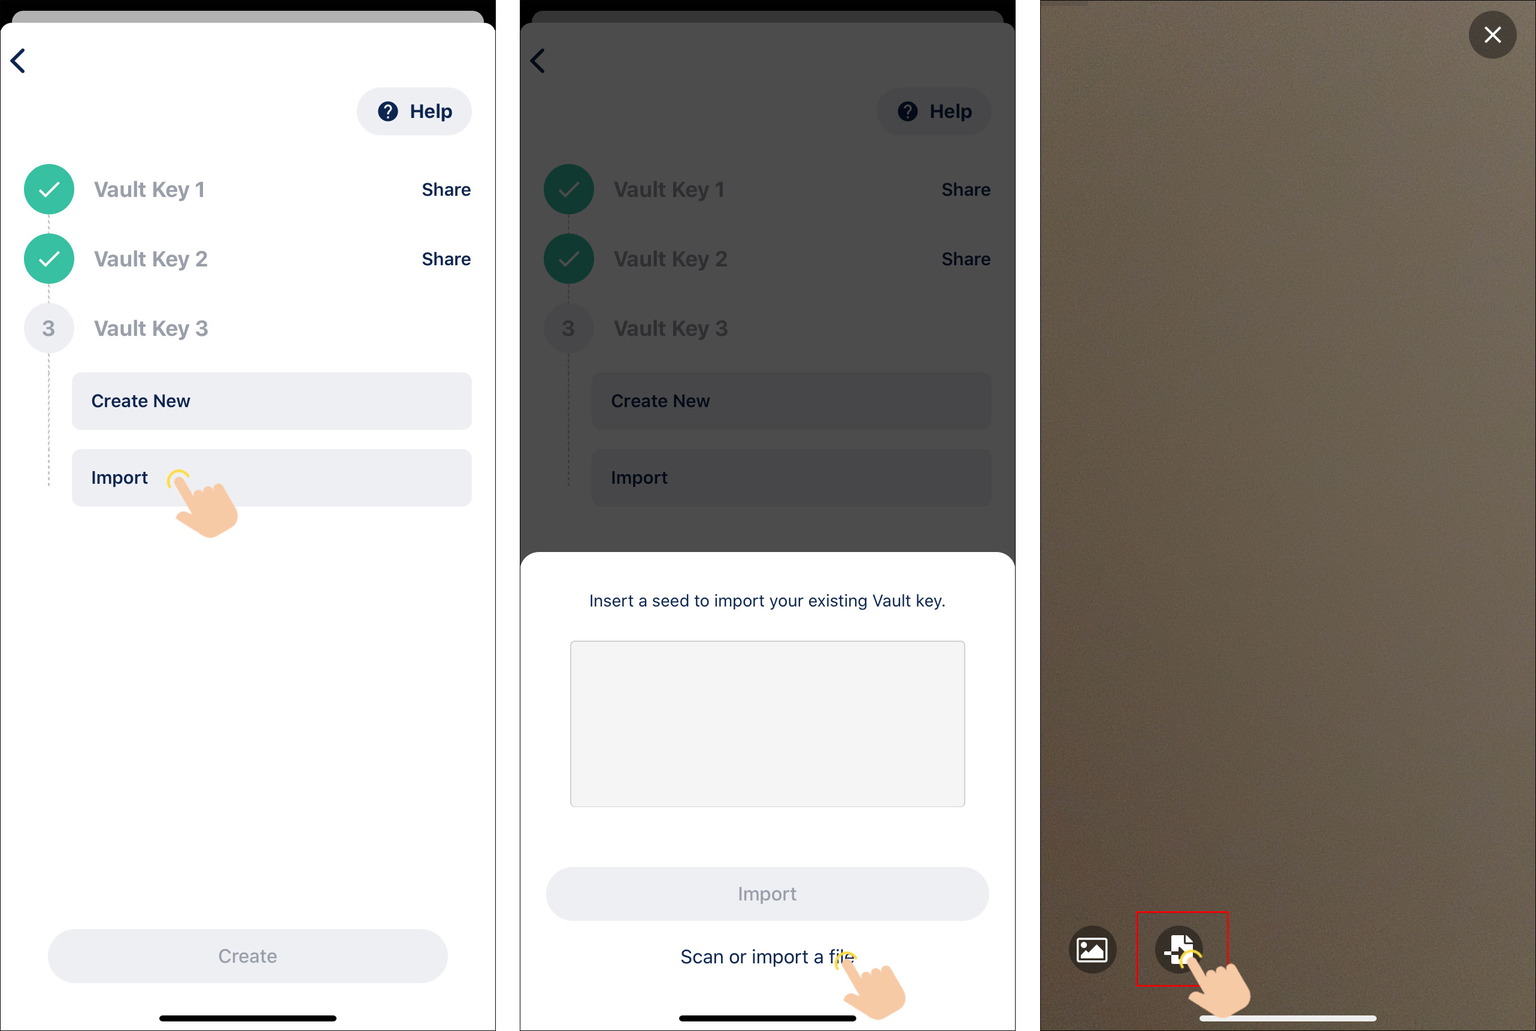
Click [Import] under "Vault Key 3" > [Scan or import a file] > click the microSD card icon at the bottom left of the page > locate and open the Coldcard's extended public key file stored in iCloud Drive. At this point, Coldcard is imported as "Vault Key 3".
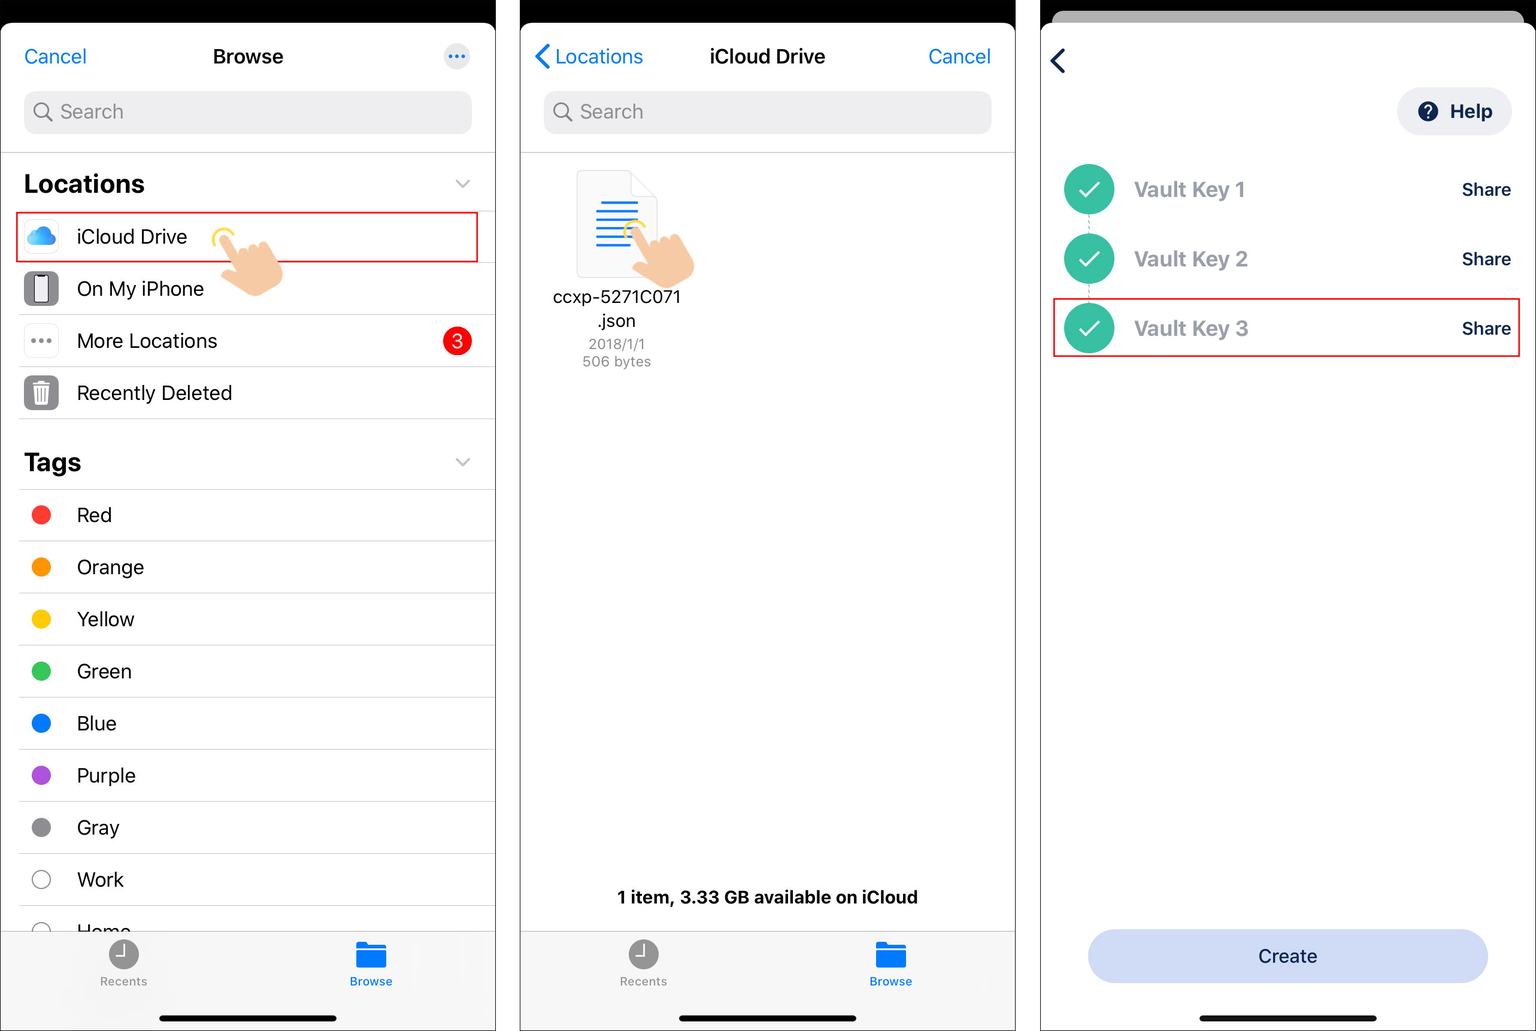
Click [Create], and a 2/3 multi-signature wallet is created.
Step Four:Import the Multisig Wallet to Keystone Wallet
BlueWallet: Go to the corresponding wallet and select the [•••] button on the top right corner, then select the [Export Coordination Setup] option to reveal a dynamic QR code.
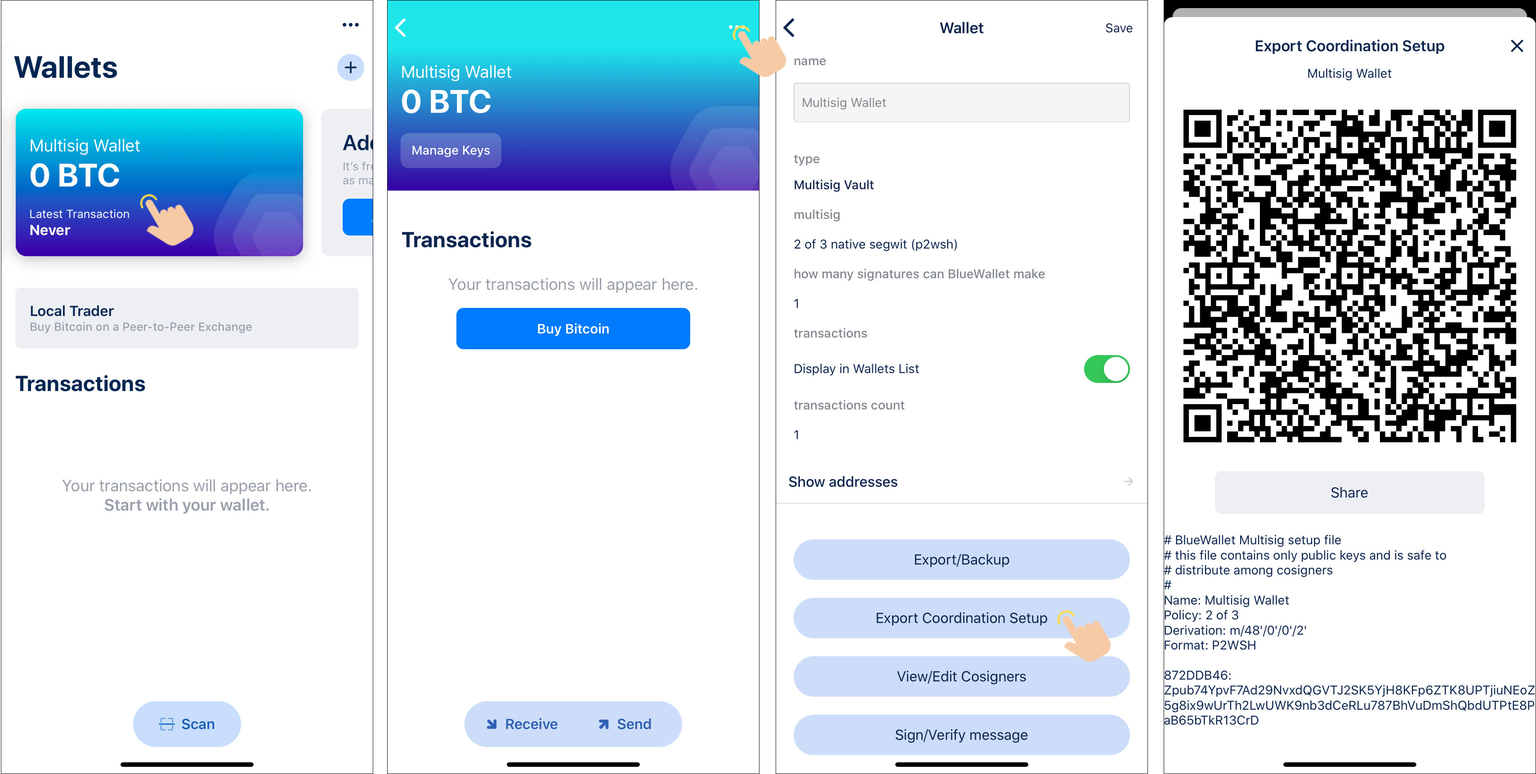
Keystone: Click the icon in the upper left corner > enter [Wallet Profile] > click [Add Multisig Wallet] > click [Via Camera] > scan the dynamic QR code displayed by BlueWallet > check the wallet information and click [Confirm] > the Multisig wallet is imported.
Step Five: Receiving bitcoin to the 2/3 multisig address
You can use either the Keystone 3 Pro or BlueWallet wallet's displayed receiving address to receive cryptocurrency.
Receive via Keystone 3 Pro
- On the Keystone 3 Pro homepage, click the top left corner to enter [Wallet Profile], select [Multisig Wallet], and select [Currently Default Wallet].
- Return to the Keystone 3 Pro homepage, select [Receive], and the corresponding receiving address and QR code will be displayed.
- Keystone: Click [Receive] to display the receiving address to the sender.
Receive via BlueWallet
- BlueWallet: Select the corresponding multi-signature wallet, click [Receive], and display the receiving address to the sender.
Step Six: Send BTC from the 2/3 Multisig wallet
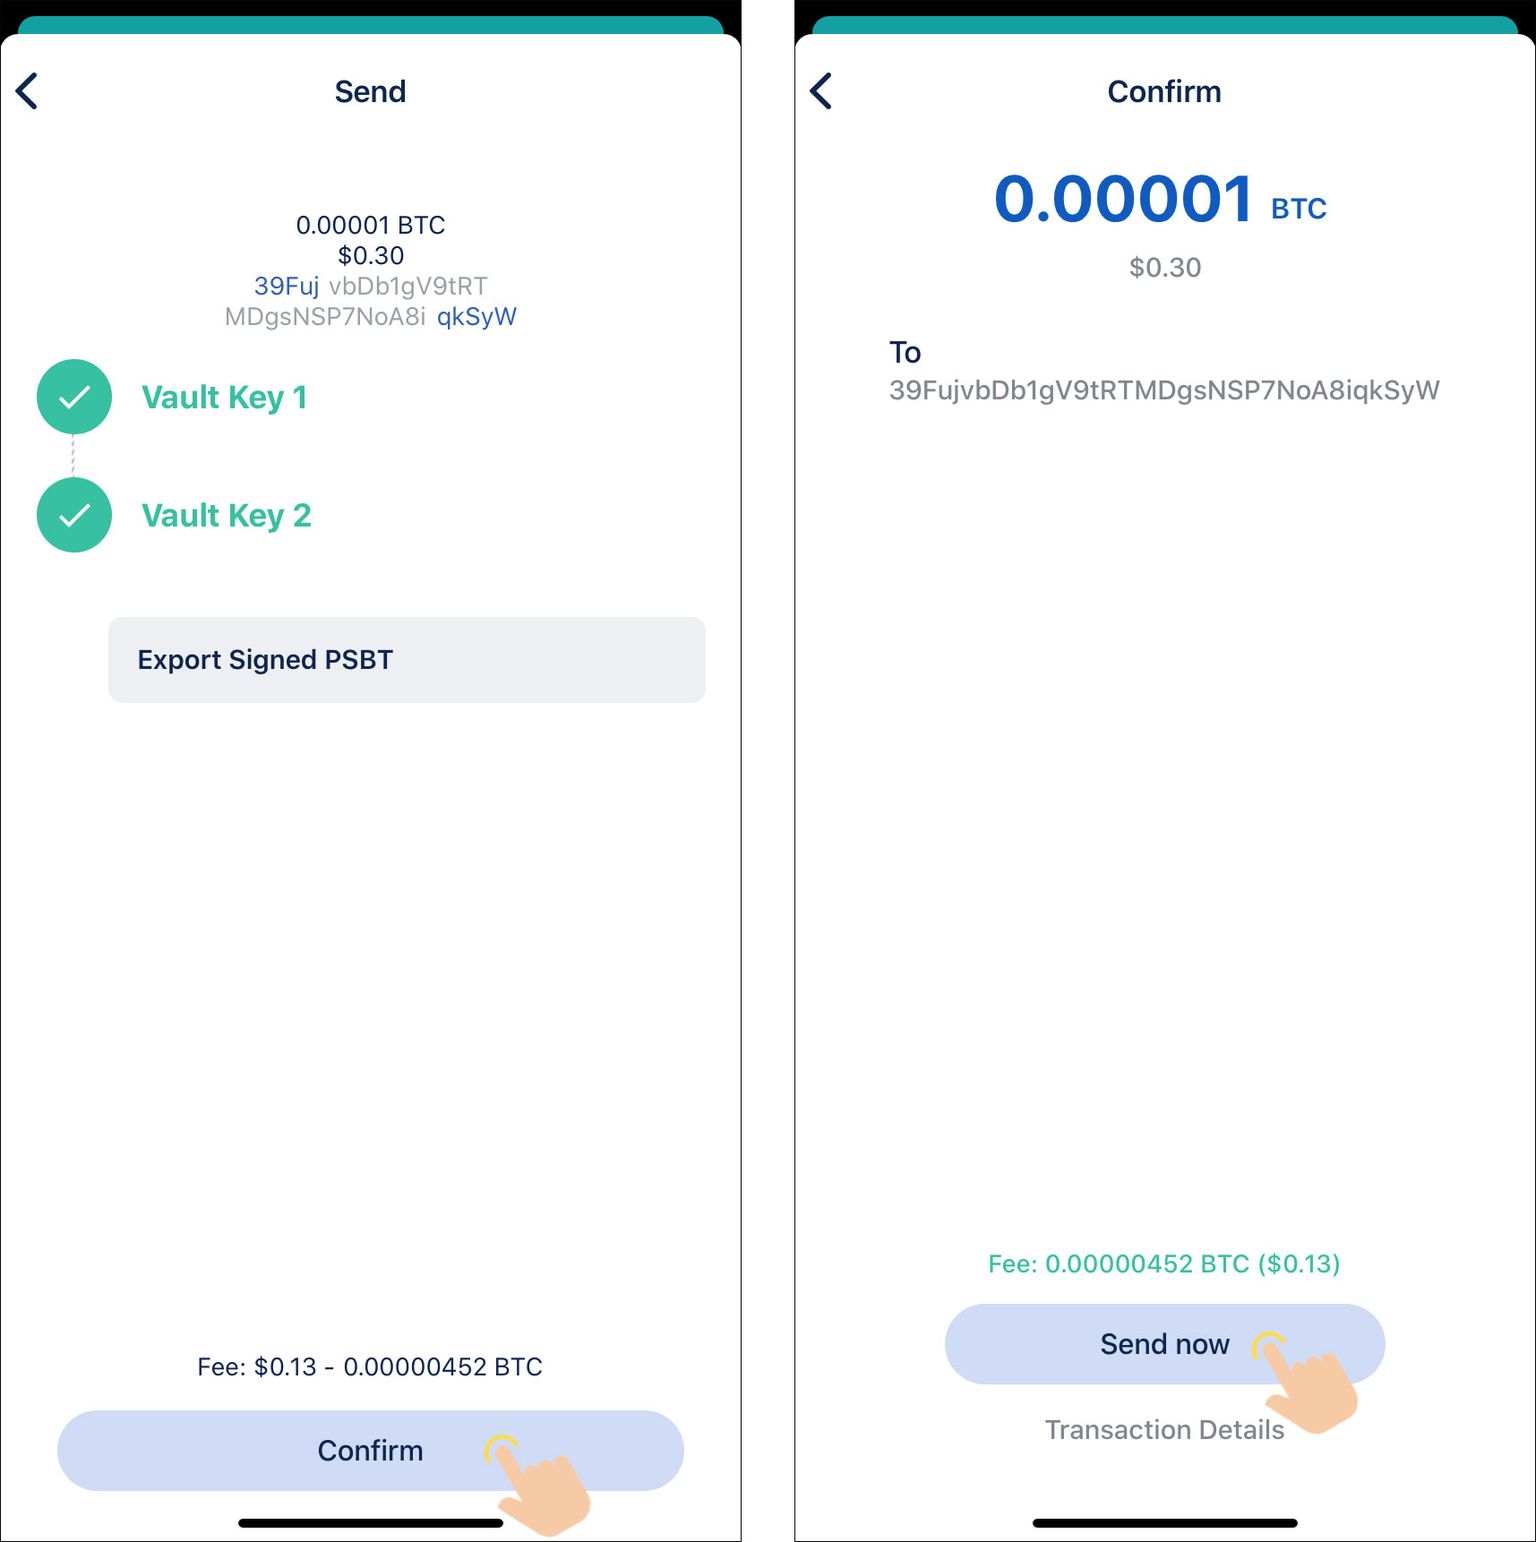
1.Create a 2/3 Multisig Transaction on Blue Wallet
Select the corresponding multi-signature wallet, click [Send] to enter the sending interface.
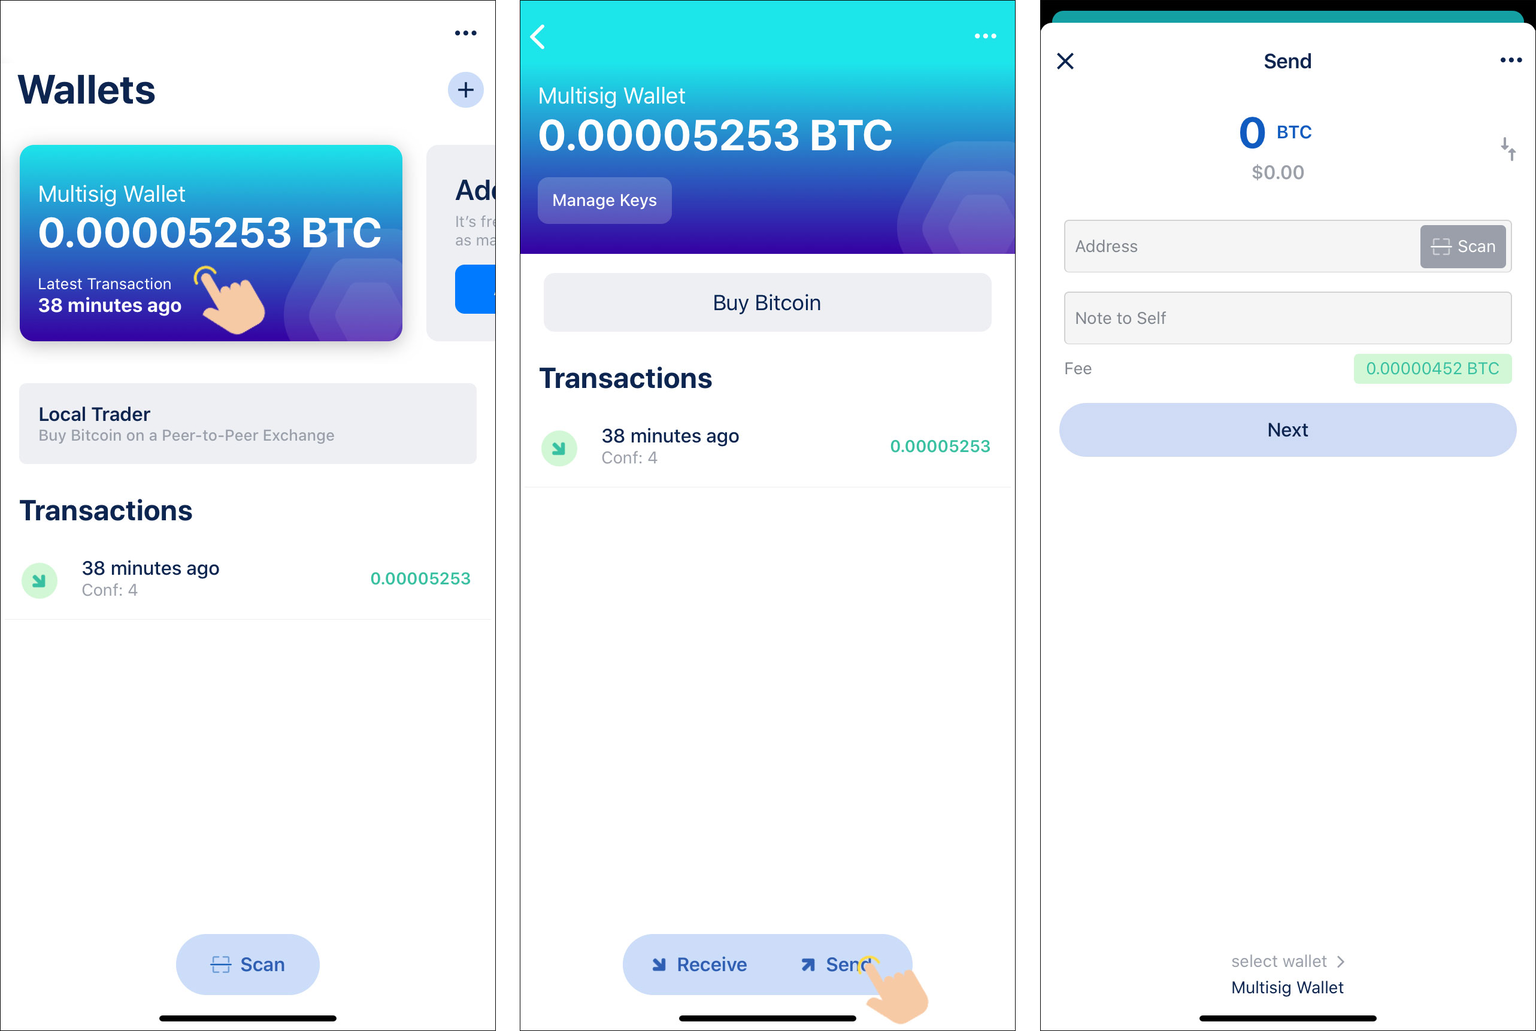
Set the recipient address, amount to send, transaction fee, and note (optional), and click [Next] to enter the signing page. At this point, you can see that BlueWallet has automatically completed the first signature.
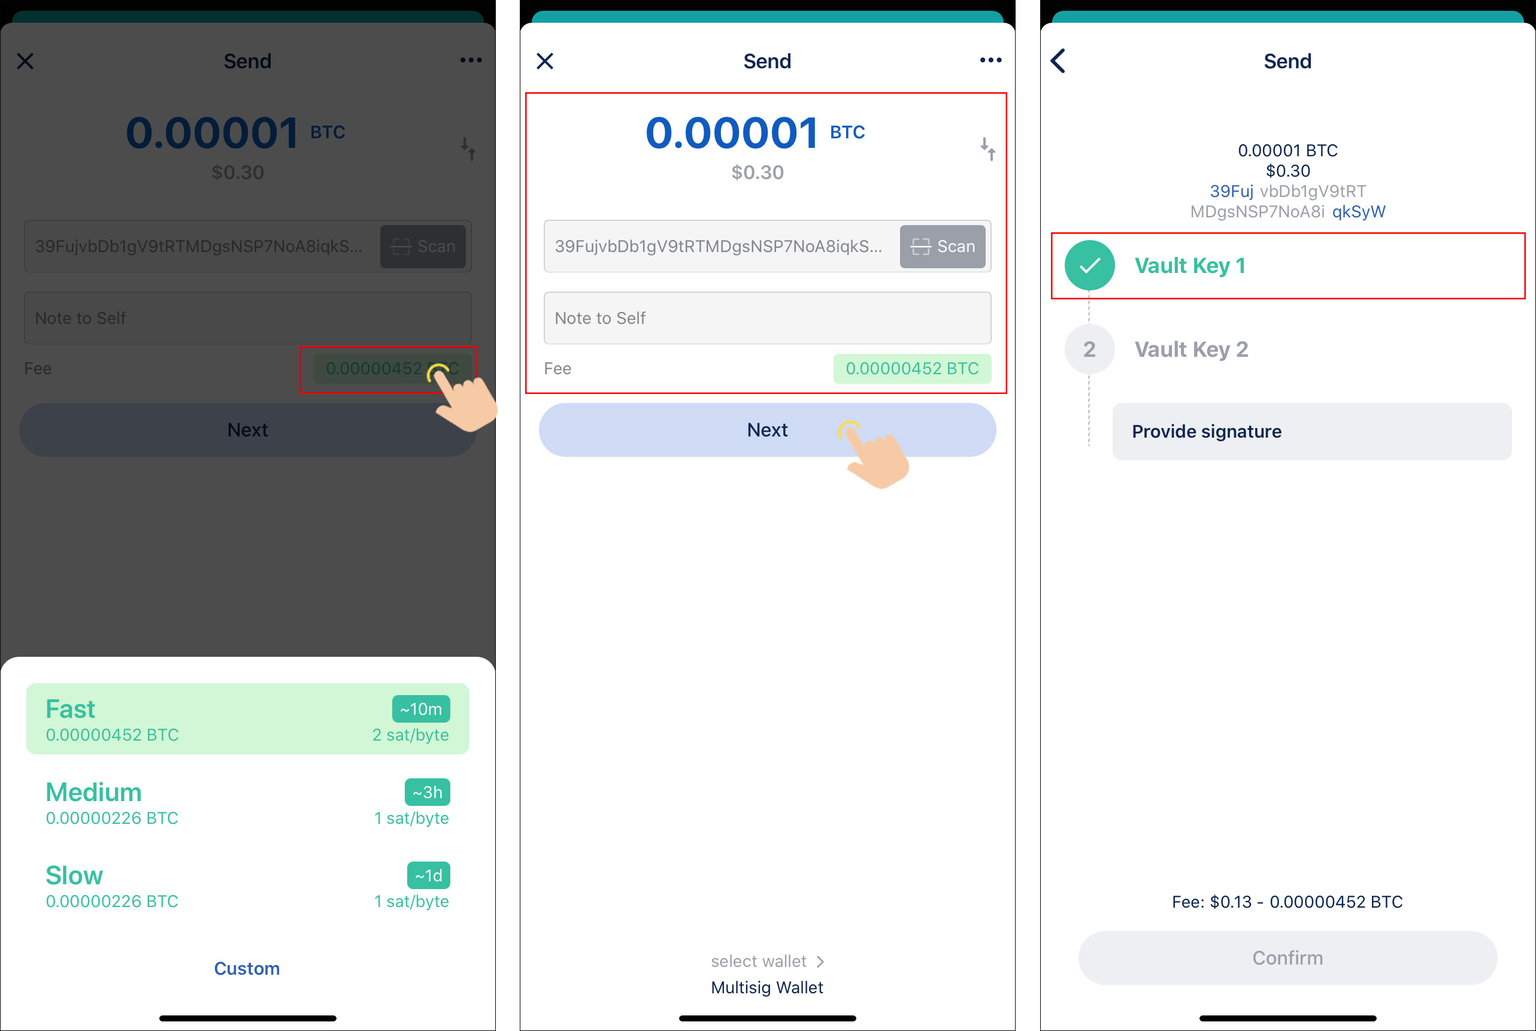
2. Partially sign Multisig transaction with Keystone
BlueWallet: Click [Vault Key 2] > [Provide signature] > BlueWallet will display the partially signed transaction data as a dynamic QR code.
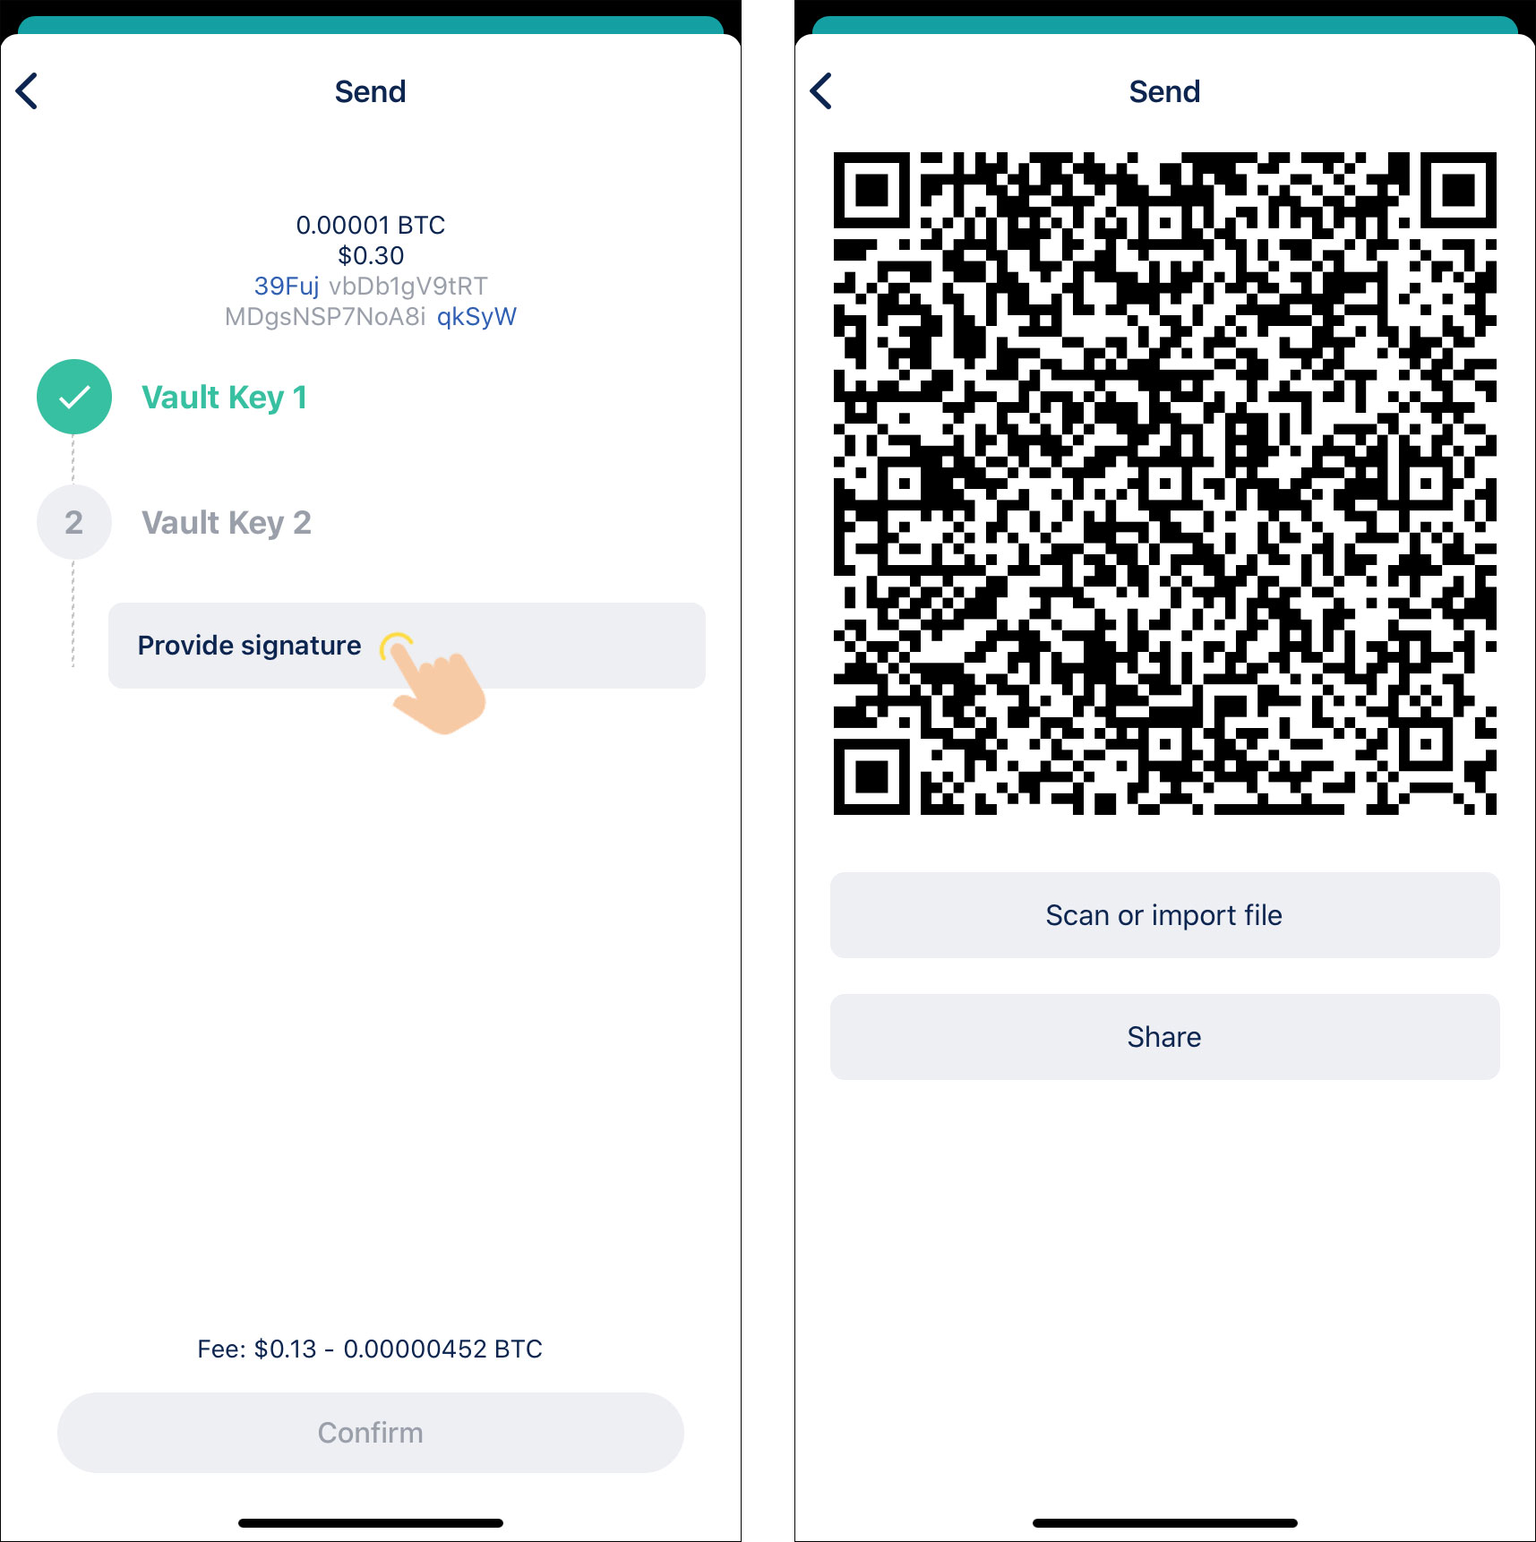
Keystone: Click the icon in the upper left corner to enter [Wallet Profile] > click [Multisig Wallet] > enter Wallet Details, click [Set as Current Wallet], return to the main interface, and click the [Scan] button at the bottom to scan the dynamic QR code displayed by BlueWallet.
Check and confirm the transaction information, click [Sign], Enter the password/fingerprint for verification, and Keystone Wallet will display the pending broadcast transaction data in QR code format.
BlueWallet: Click [Scan or import a file], scan the dynamic QR code displayed by the Keystone wallet after opening the camera. After scanning is complete, the second multi-signature participant completes the signature.
Security Note: To protect your assets, we recommend comparing the address displayed in BlueWallet with the address generated on your Keystone 3 Pro device after the connection is complete, and making sure the two addresses match exactly. Also, do not scan any external QR codes that were not generated by your Keystone device.
3. Broadcast the Transaction on BlueWallet
After signing is complete, click [Confirm] to enter the broadcast interface, and click [Broadcast Now] to broadcast the transaction.