BTC-Only:How to Creat a 2/2 Multisig Wallet with Nunchuk
BTC-Only hardware wallets are Single-sig Wallets, which can be paired with a multi-sig wallet like Nunchuk, allowing users to manage Keystone 3 Pro as one of the signers in a multi-sig scenario. Below are the key points to set up a multi-sig wallet with Nunchuk:
Preparation:
- Wallet preparation: Charge your Keystone wallet to at least 20%.
- Keystone firmware should be updated to version V1.1.0 (BTC-Only) which can support a multi-sig ratio of 1/2.
- Coldcard firmware should be updated to version V2.1.0 to support a multi-sig ratio of 2/2.
- Ensure the Nunchuk app is updated to V1.9.0 and is compatible with iOS 13.1 and Android 5.0 and above.
- A MicroSD card formatted as FAT32 is required, with a recommended capacity of 512GB.
Setting up a 2/2 Multi-Sig Wallet in Nunchuk:
1. Export the Keystone's xPub:
- Click the icon button on the top left of the page > enter [Wallet Profile]
- Click [Show/Export Extended Public Key] > click [Multisig Wallet] to display the QR code.
2. Exporting the Coldcard's xPub:
- Insert a MicroSD card into the Coldcard wallet.
- In the Coldcard wallet, navigate to 'Settings' > 'Multisig Wallets' > 'Export XPUB', and save the XPUB to the MicroSD card.
3. On the Nunchuk app, create and manage a Multisig wallet:
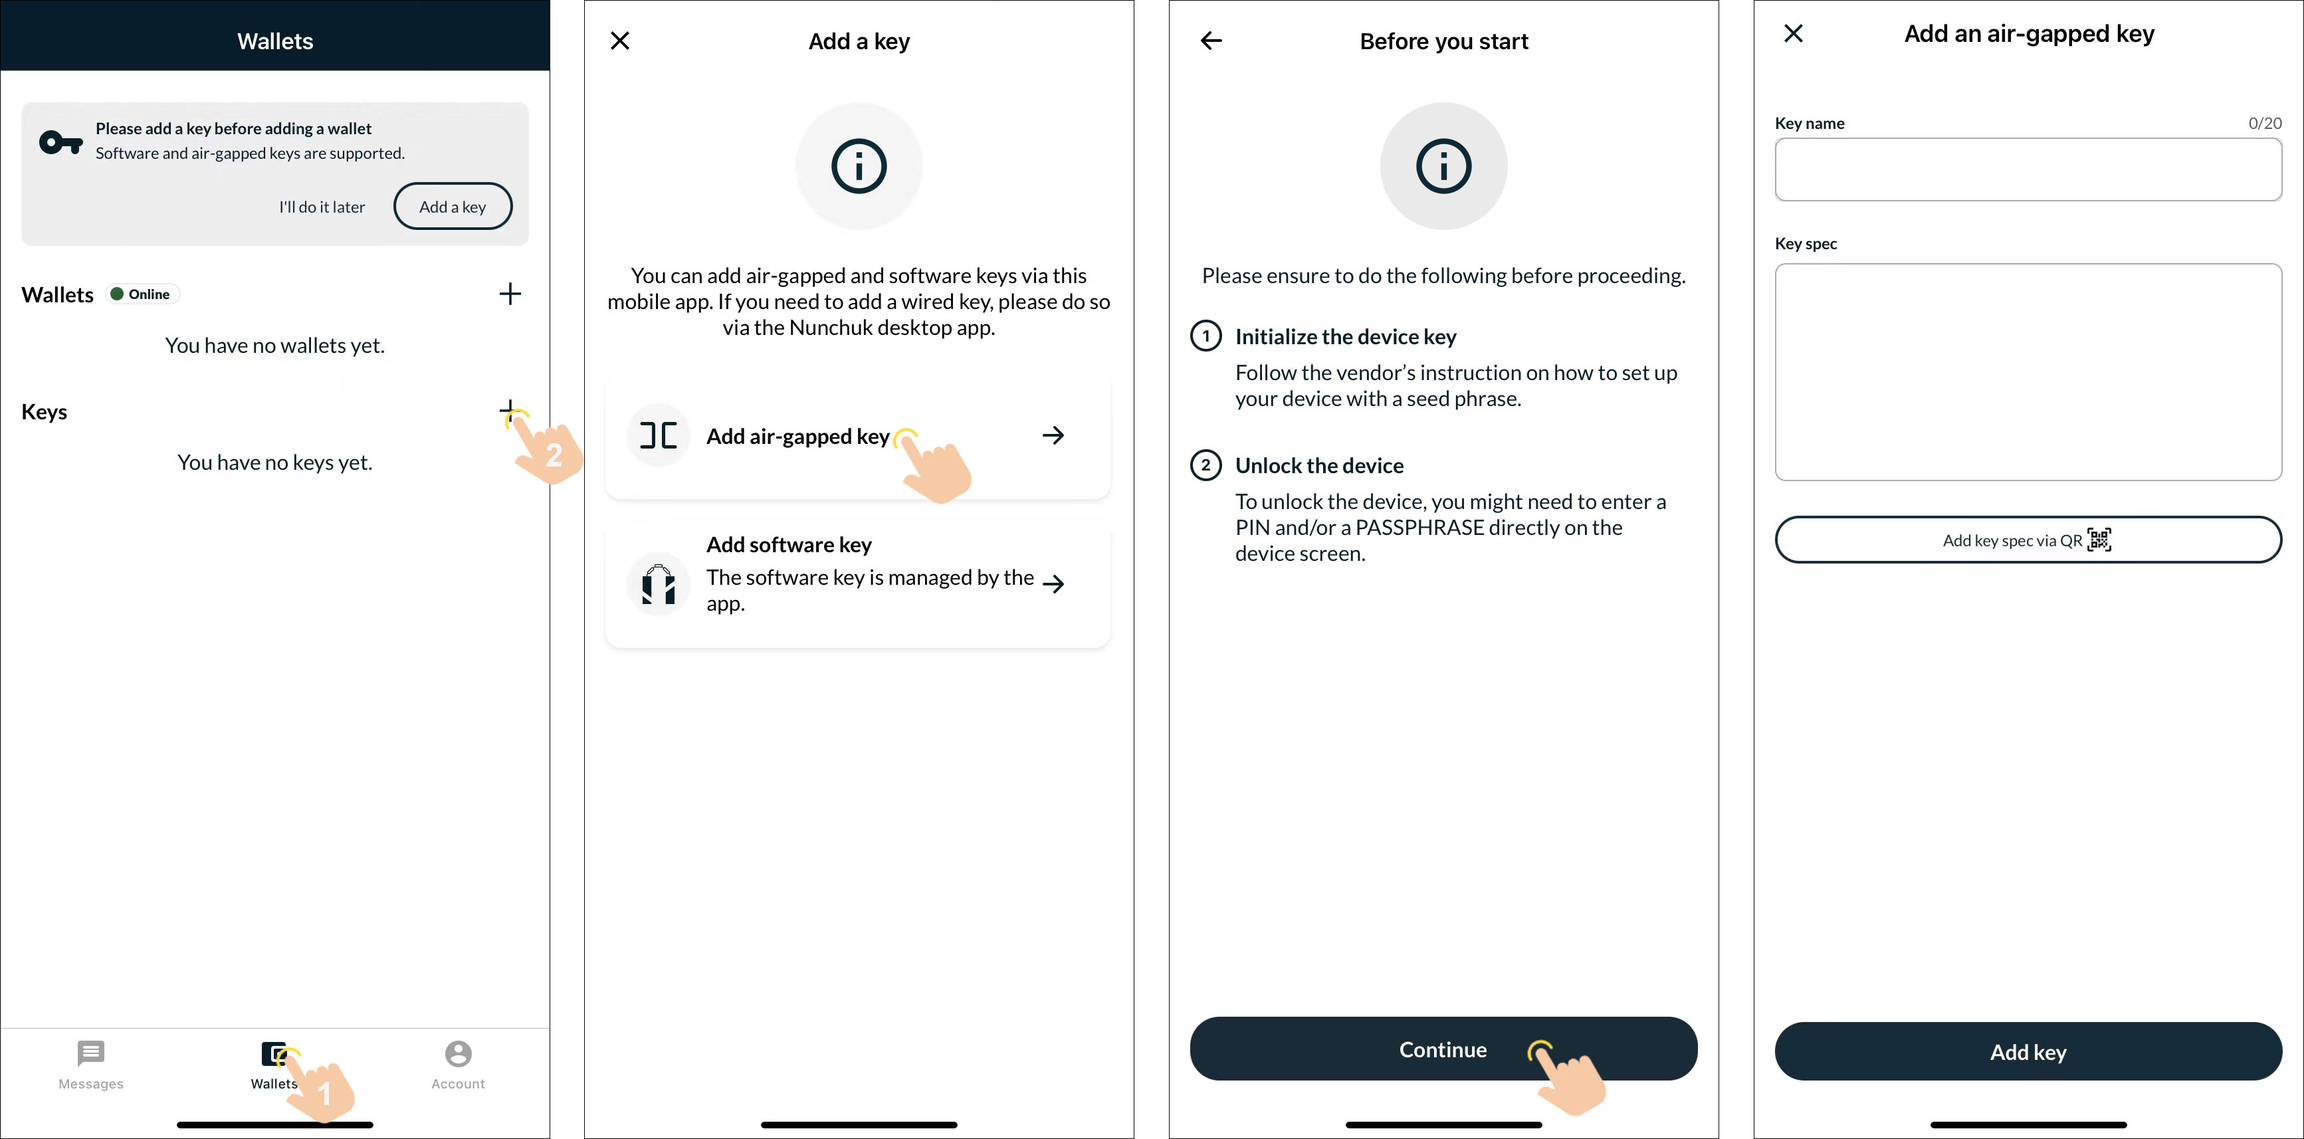
Open Nunchuk to access your Nunchuk wallet.
Click on 'Add a key' and then '+', select 'Add air-gapped key', and continue.
Name your wallet and scan the QR code from keystone.
Similarly, export the Coldcard's XPUB as part of the multisig wallet.
4. Finalizing the 2/2 Multi-Sig Wallet in Nunchuk:
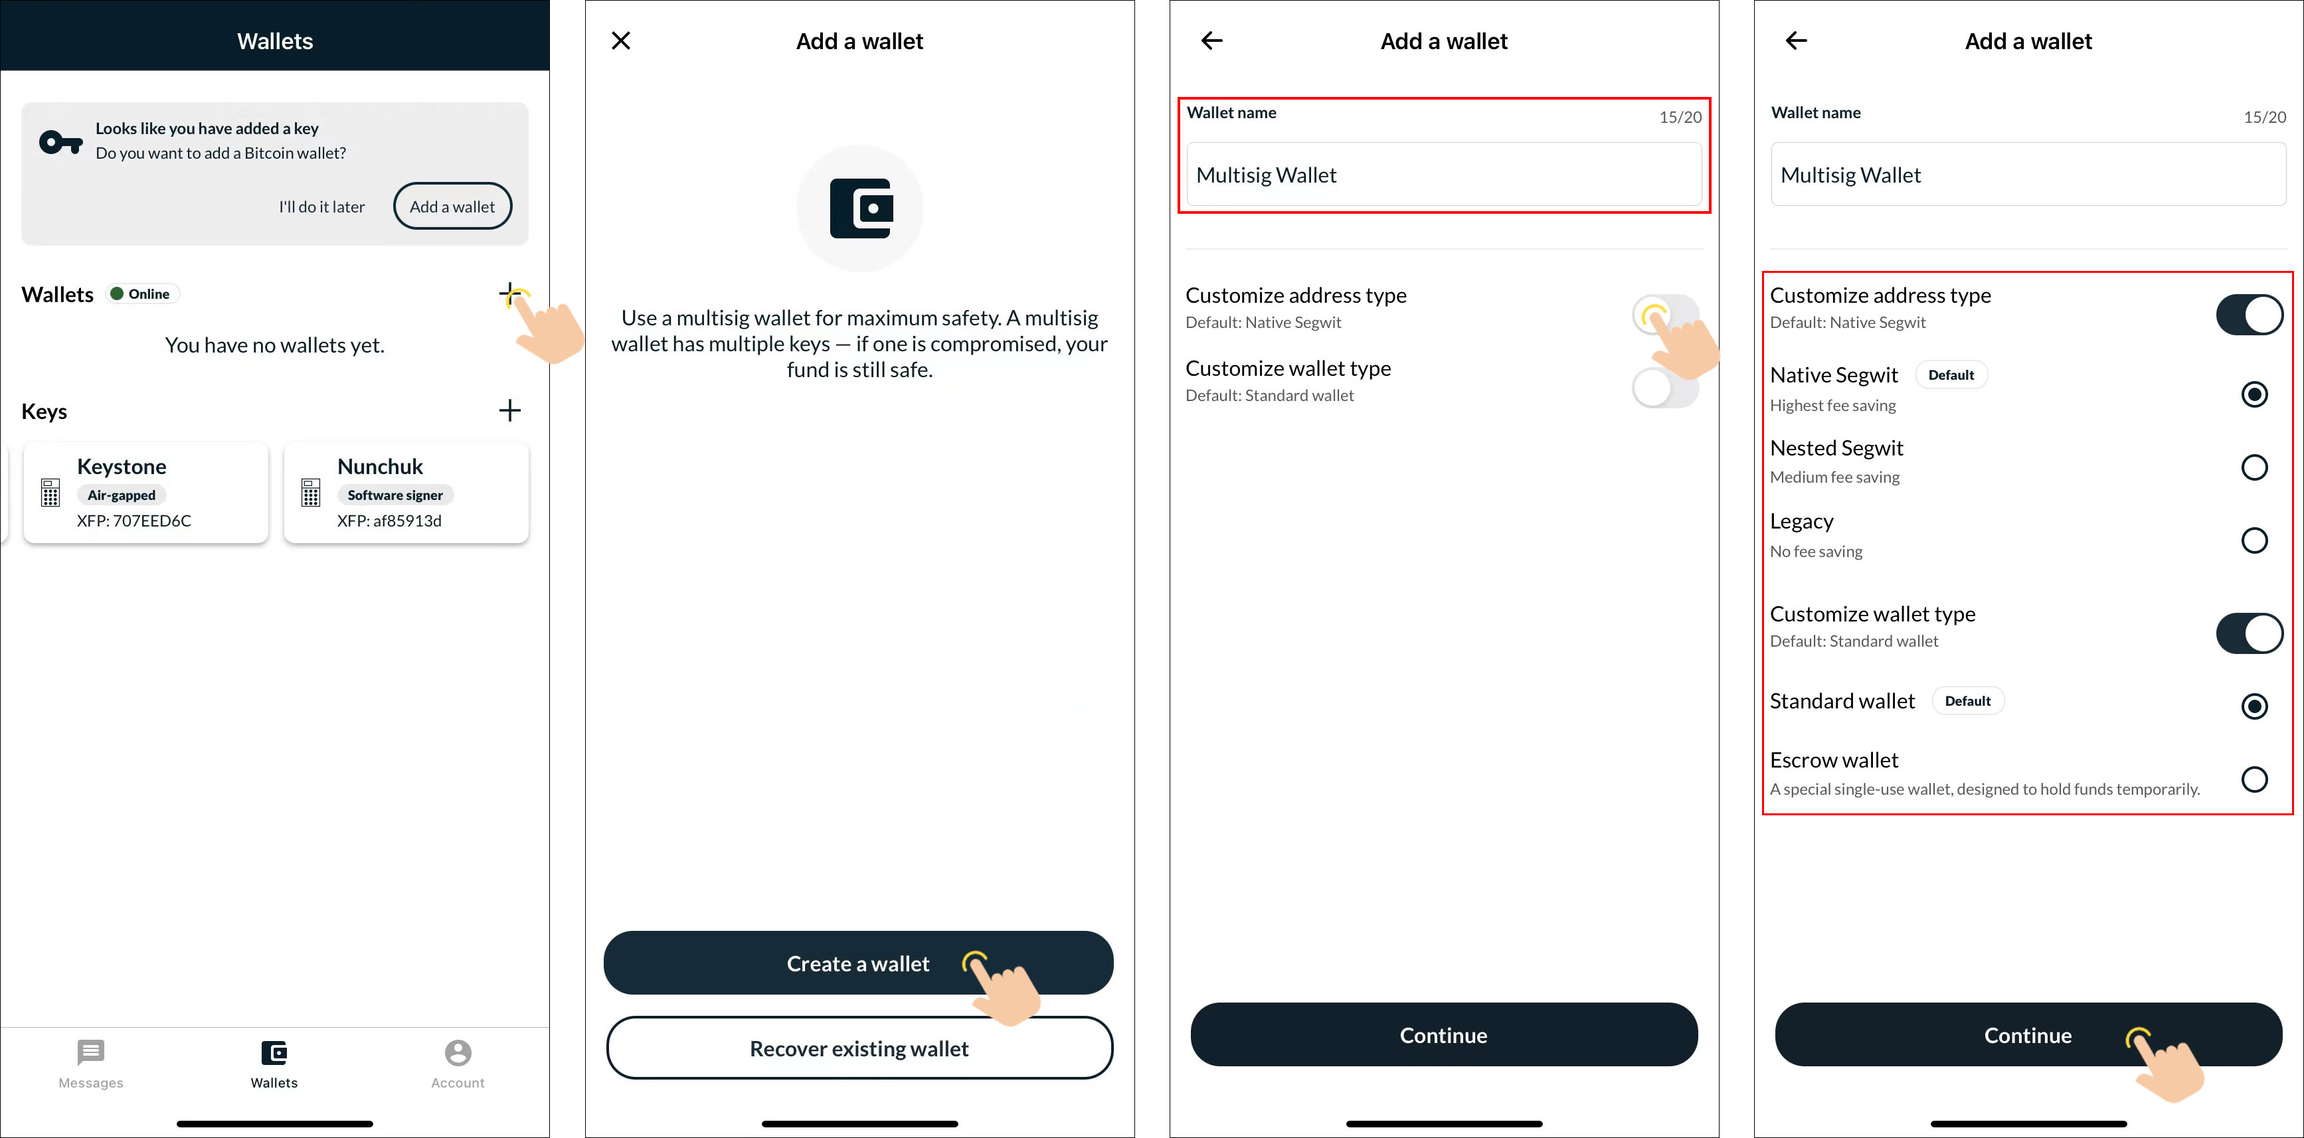
Open Nunchuk and click on '+', then 'Create a wallet'.
Confirm the wallet's configuration, and then select 'Continue'.
Select the two keys to be parties to the multisig and set the desired number of signatures. Save the BSMS file, select I’ll do this later and import the multi-signature wallet to the Keystone wallet device in the next step.
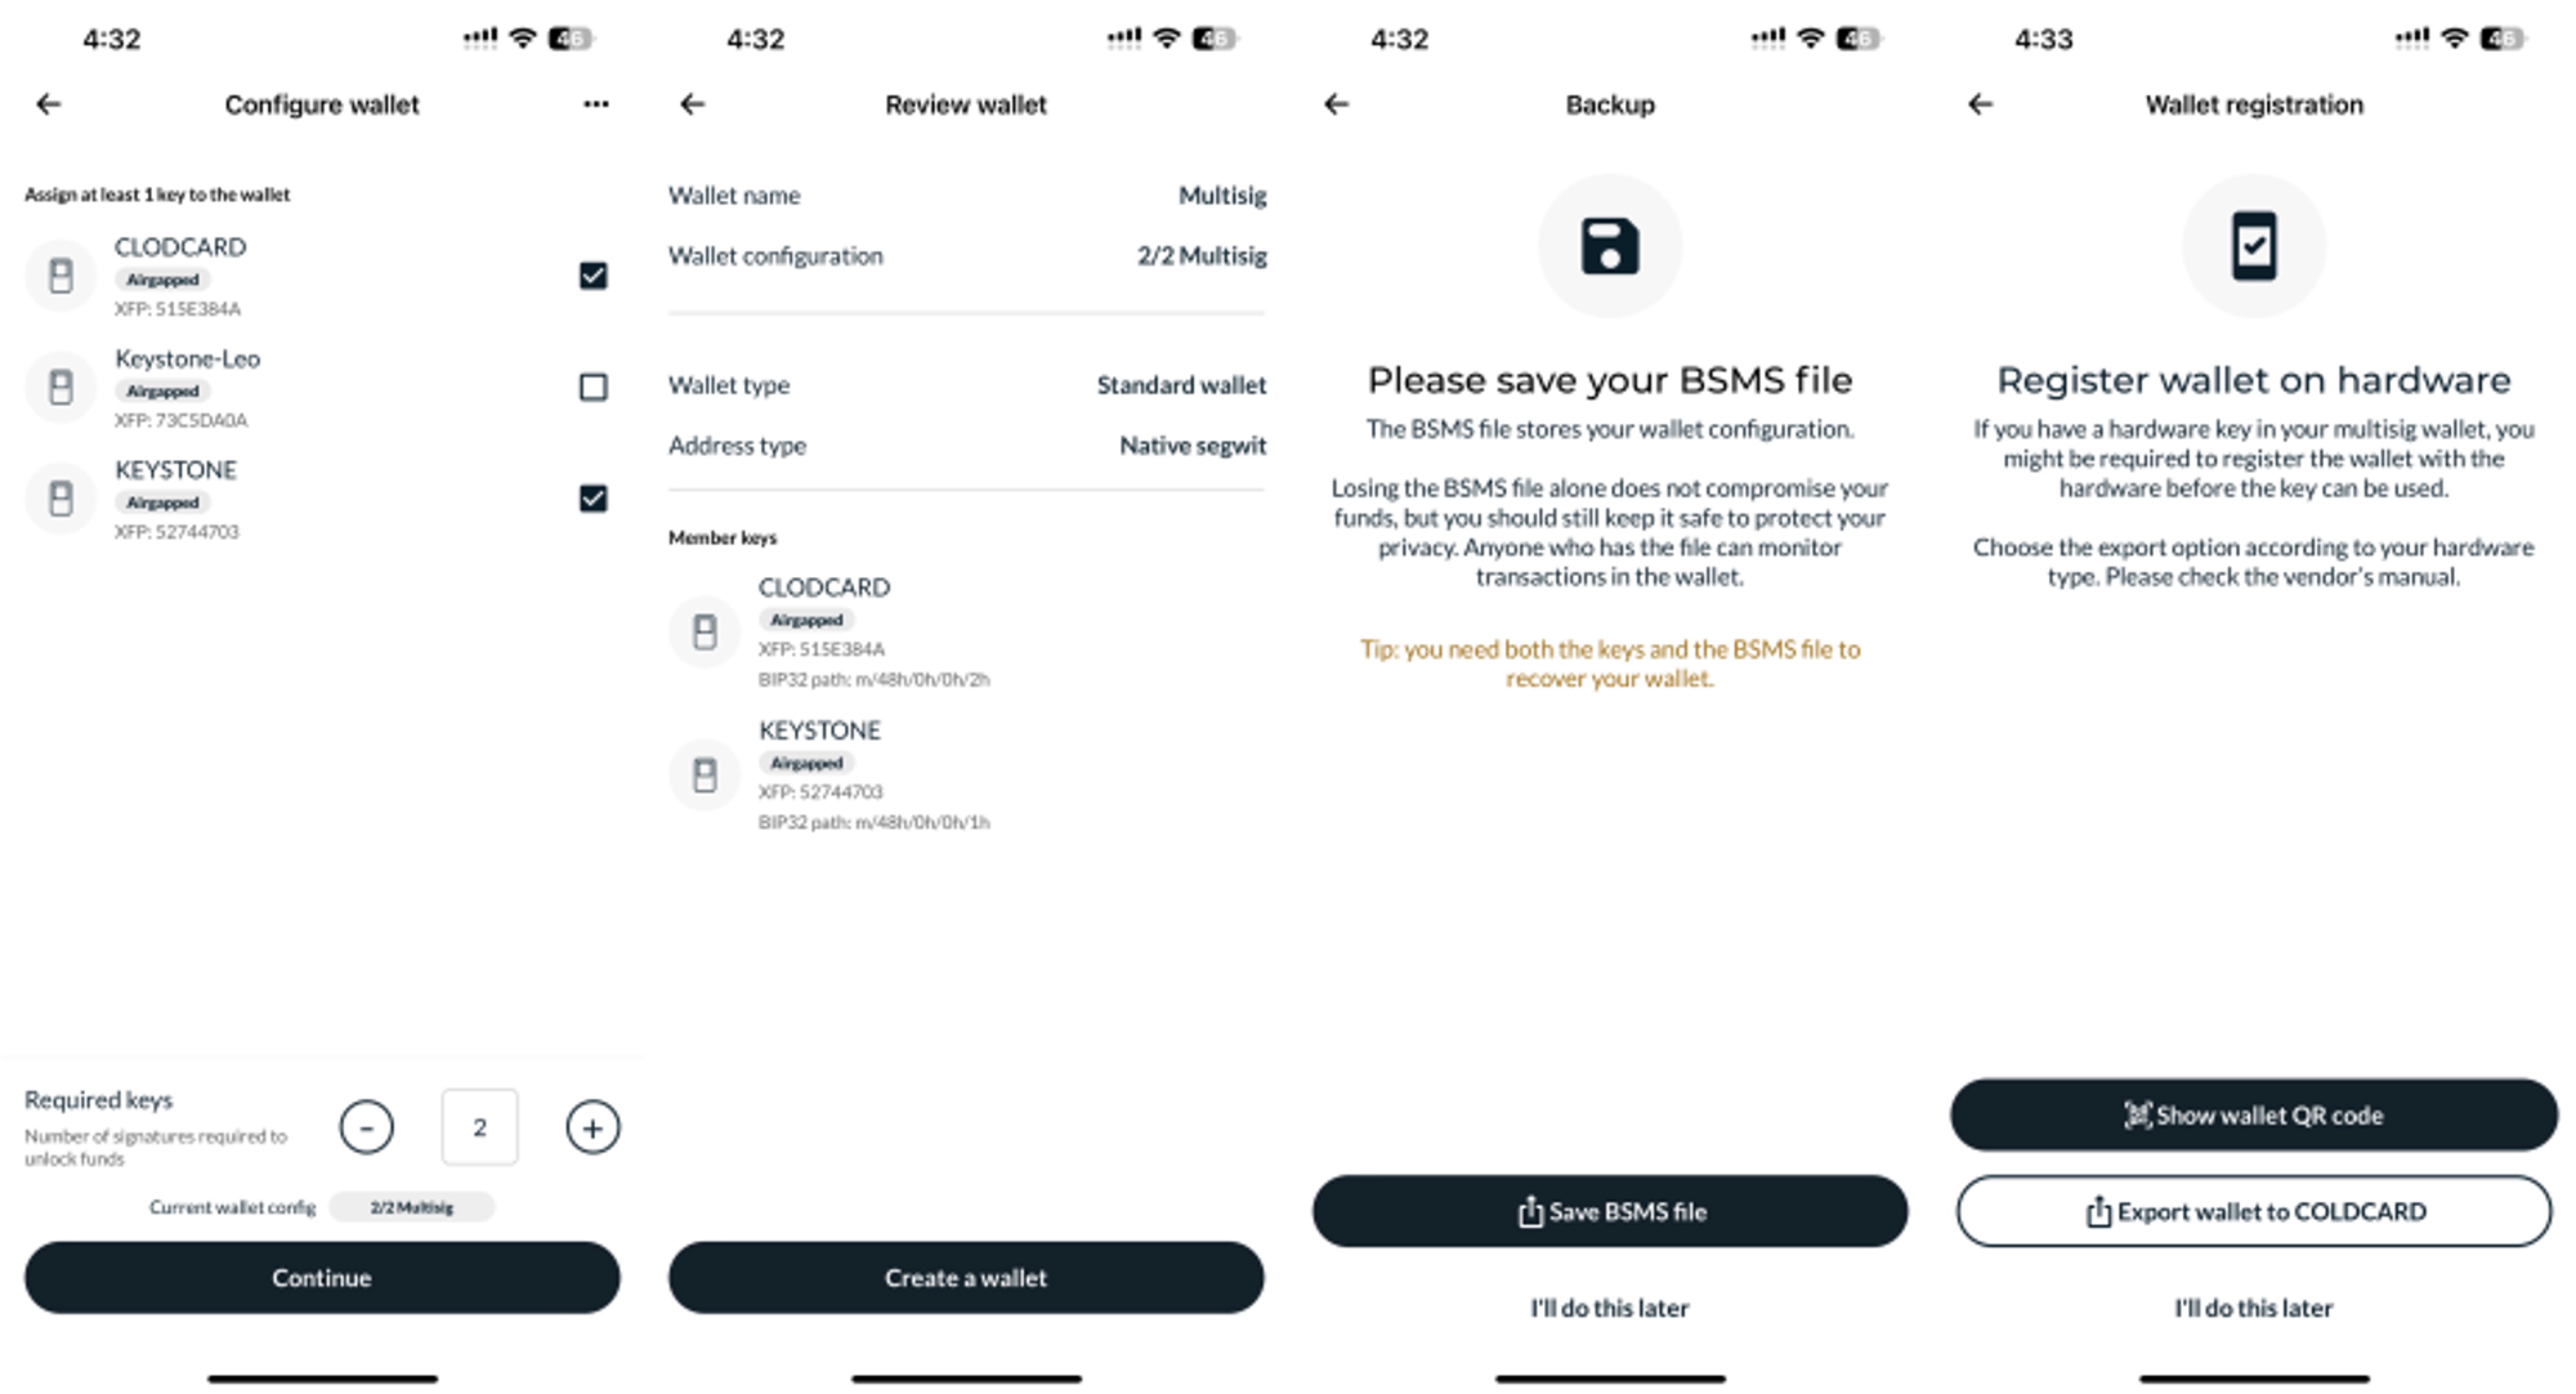
After reviewing the multisig wallet's information, complete the creation by clicking on 'Create a wallet'.
5. Import the 2/2 multisig wallet in Keystone.
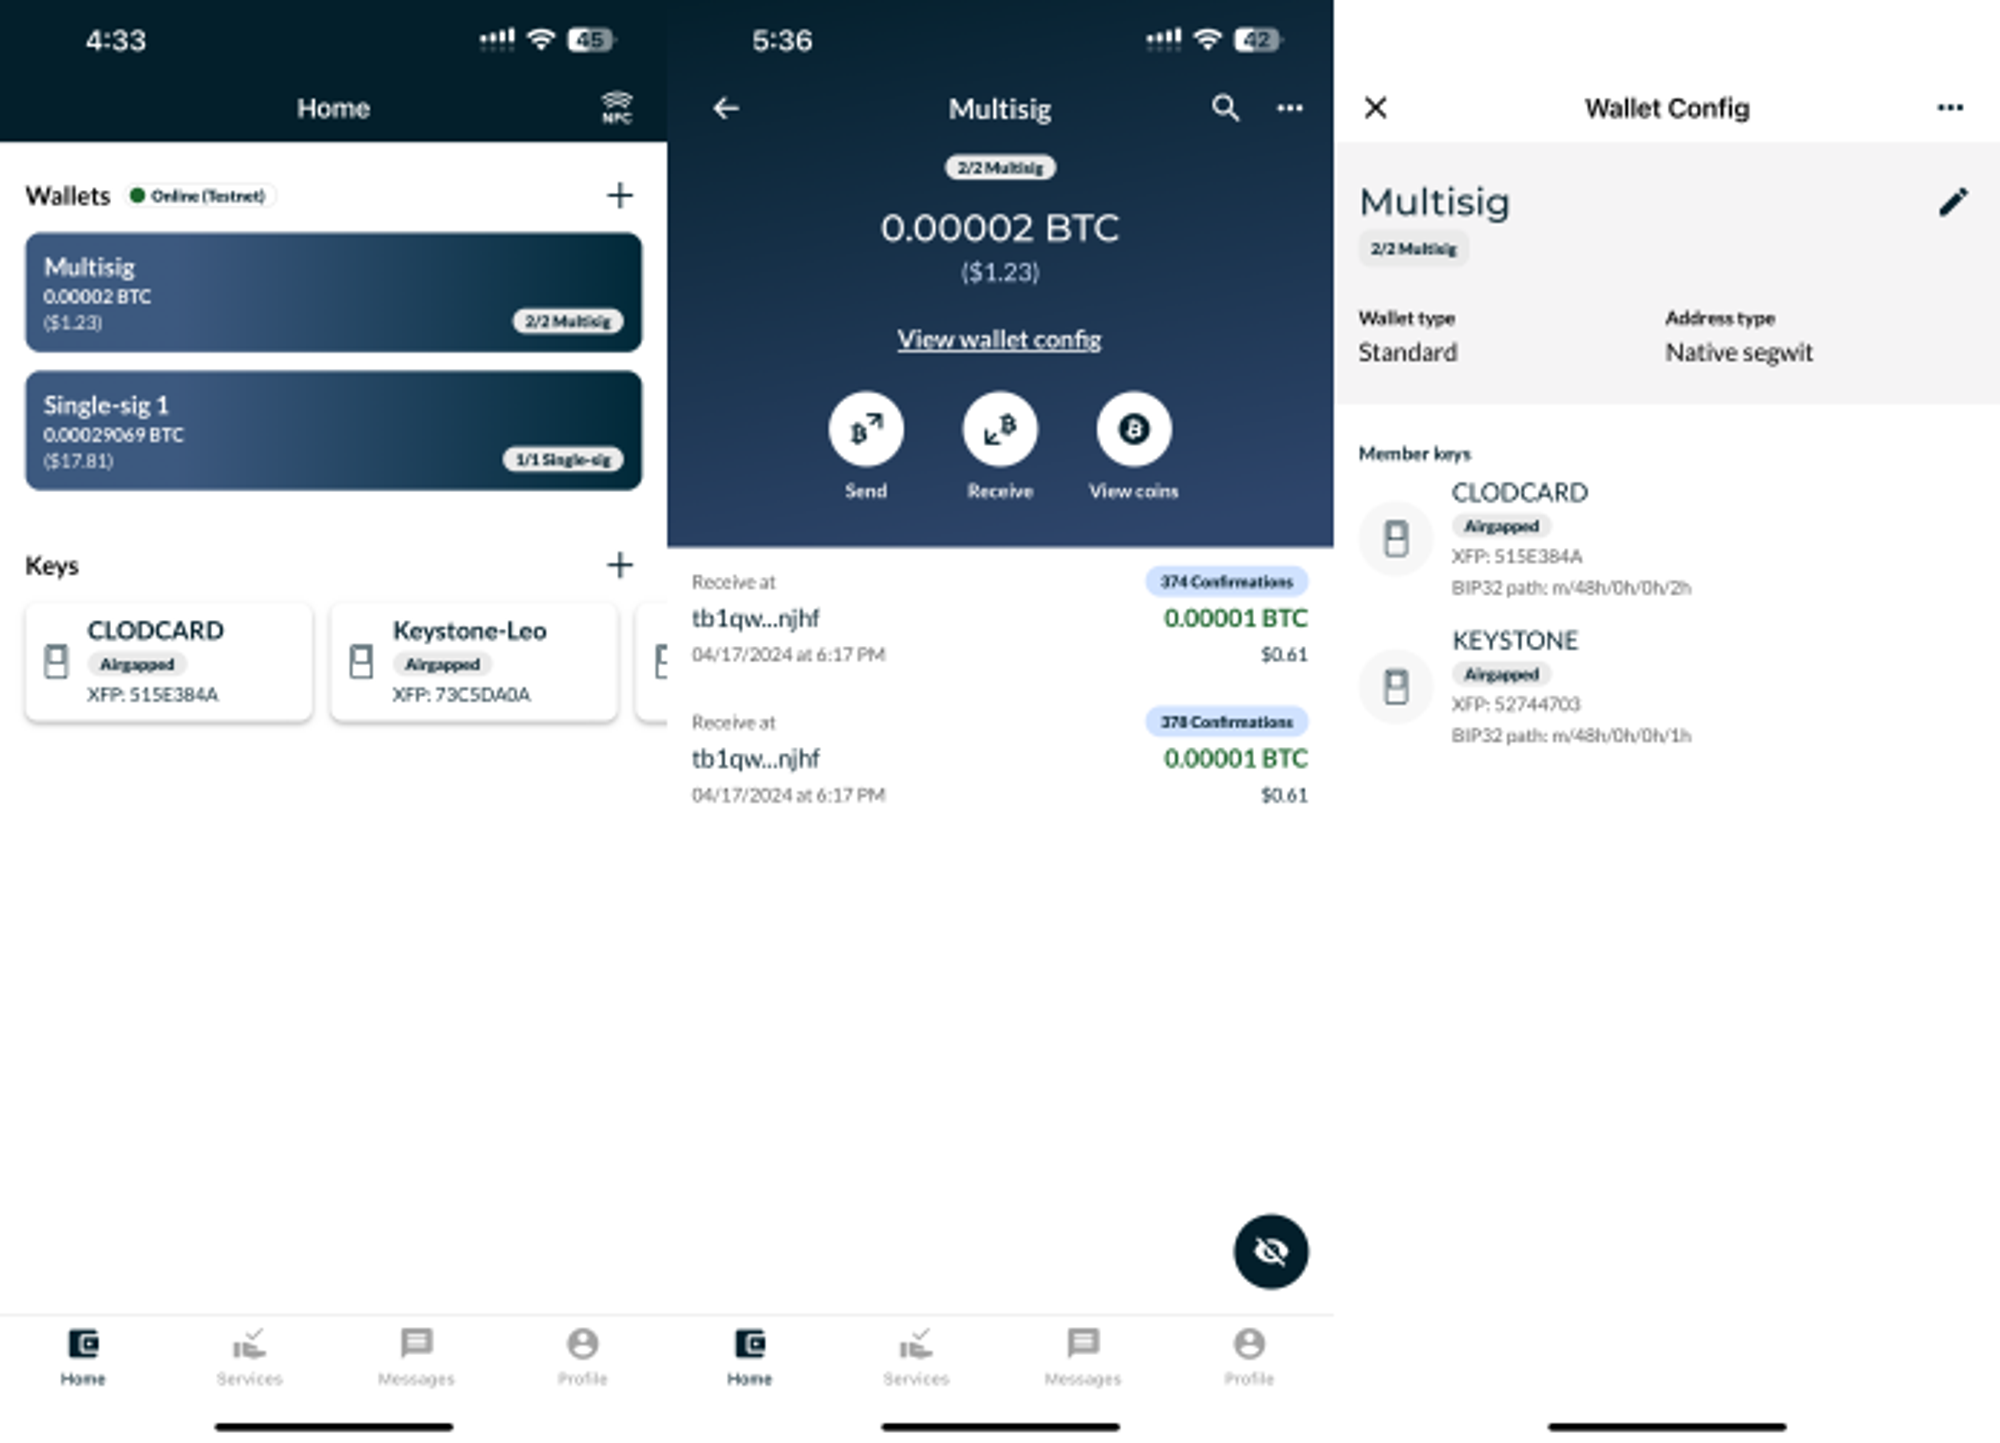
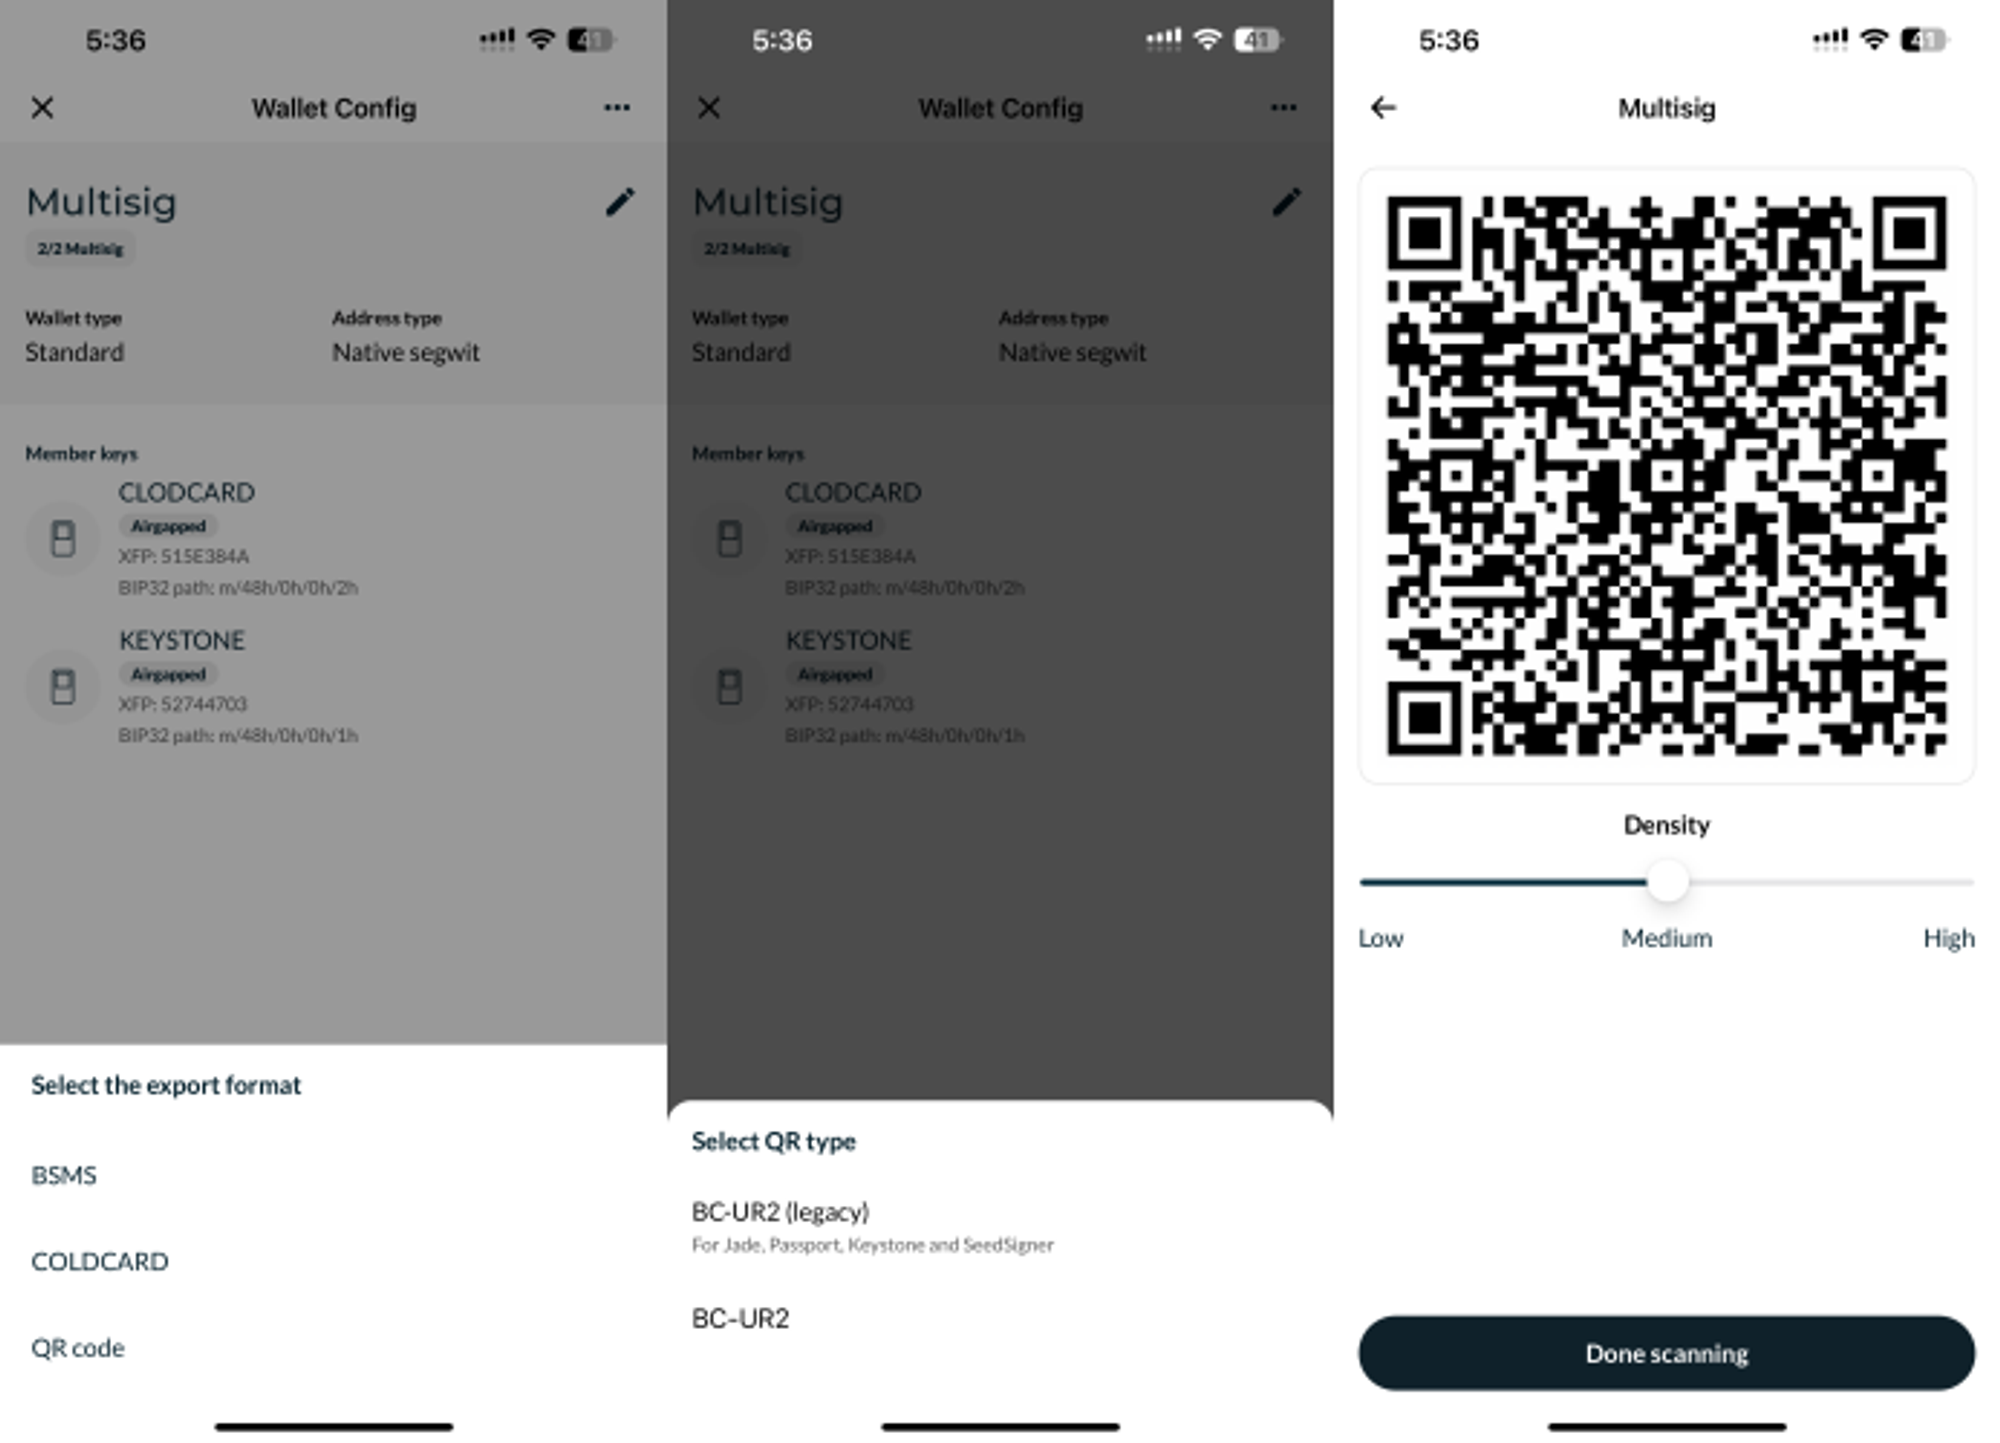
Nunchuk app: Click to enter the corresponding multi-signature wallet, click [View wallet config] > [•••] icon in the upper right corner > Select QR code > Select BC-UR2 below (note that it is not the legacy version above, that is the second generation Version)
- Keystone: Click the [Menu] button in the upper left corner of the page > Enter [Multi-signature Wallet] > [Import Multi-signature Wallet] > Click the "Scan" icon > scan QR code displayed on the Nunchuk page > Check the wallet Information and click [Confirm] > Multi-signature wallet import is completed.
Receiving BTC with Nunchuk
Keystone:
- On the Keystone 3 Pro home page, navigate to [Wallet Profile] and select [Multisig Wallet] and Click [set as Current Wallet].
- Then, on the Keystone 3 Pro home page, tap [Receive] to display the address QR code for transaction reception.
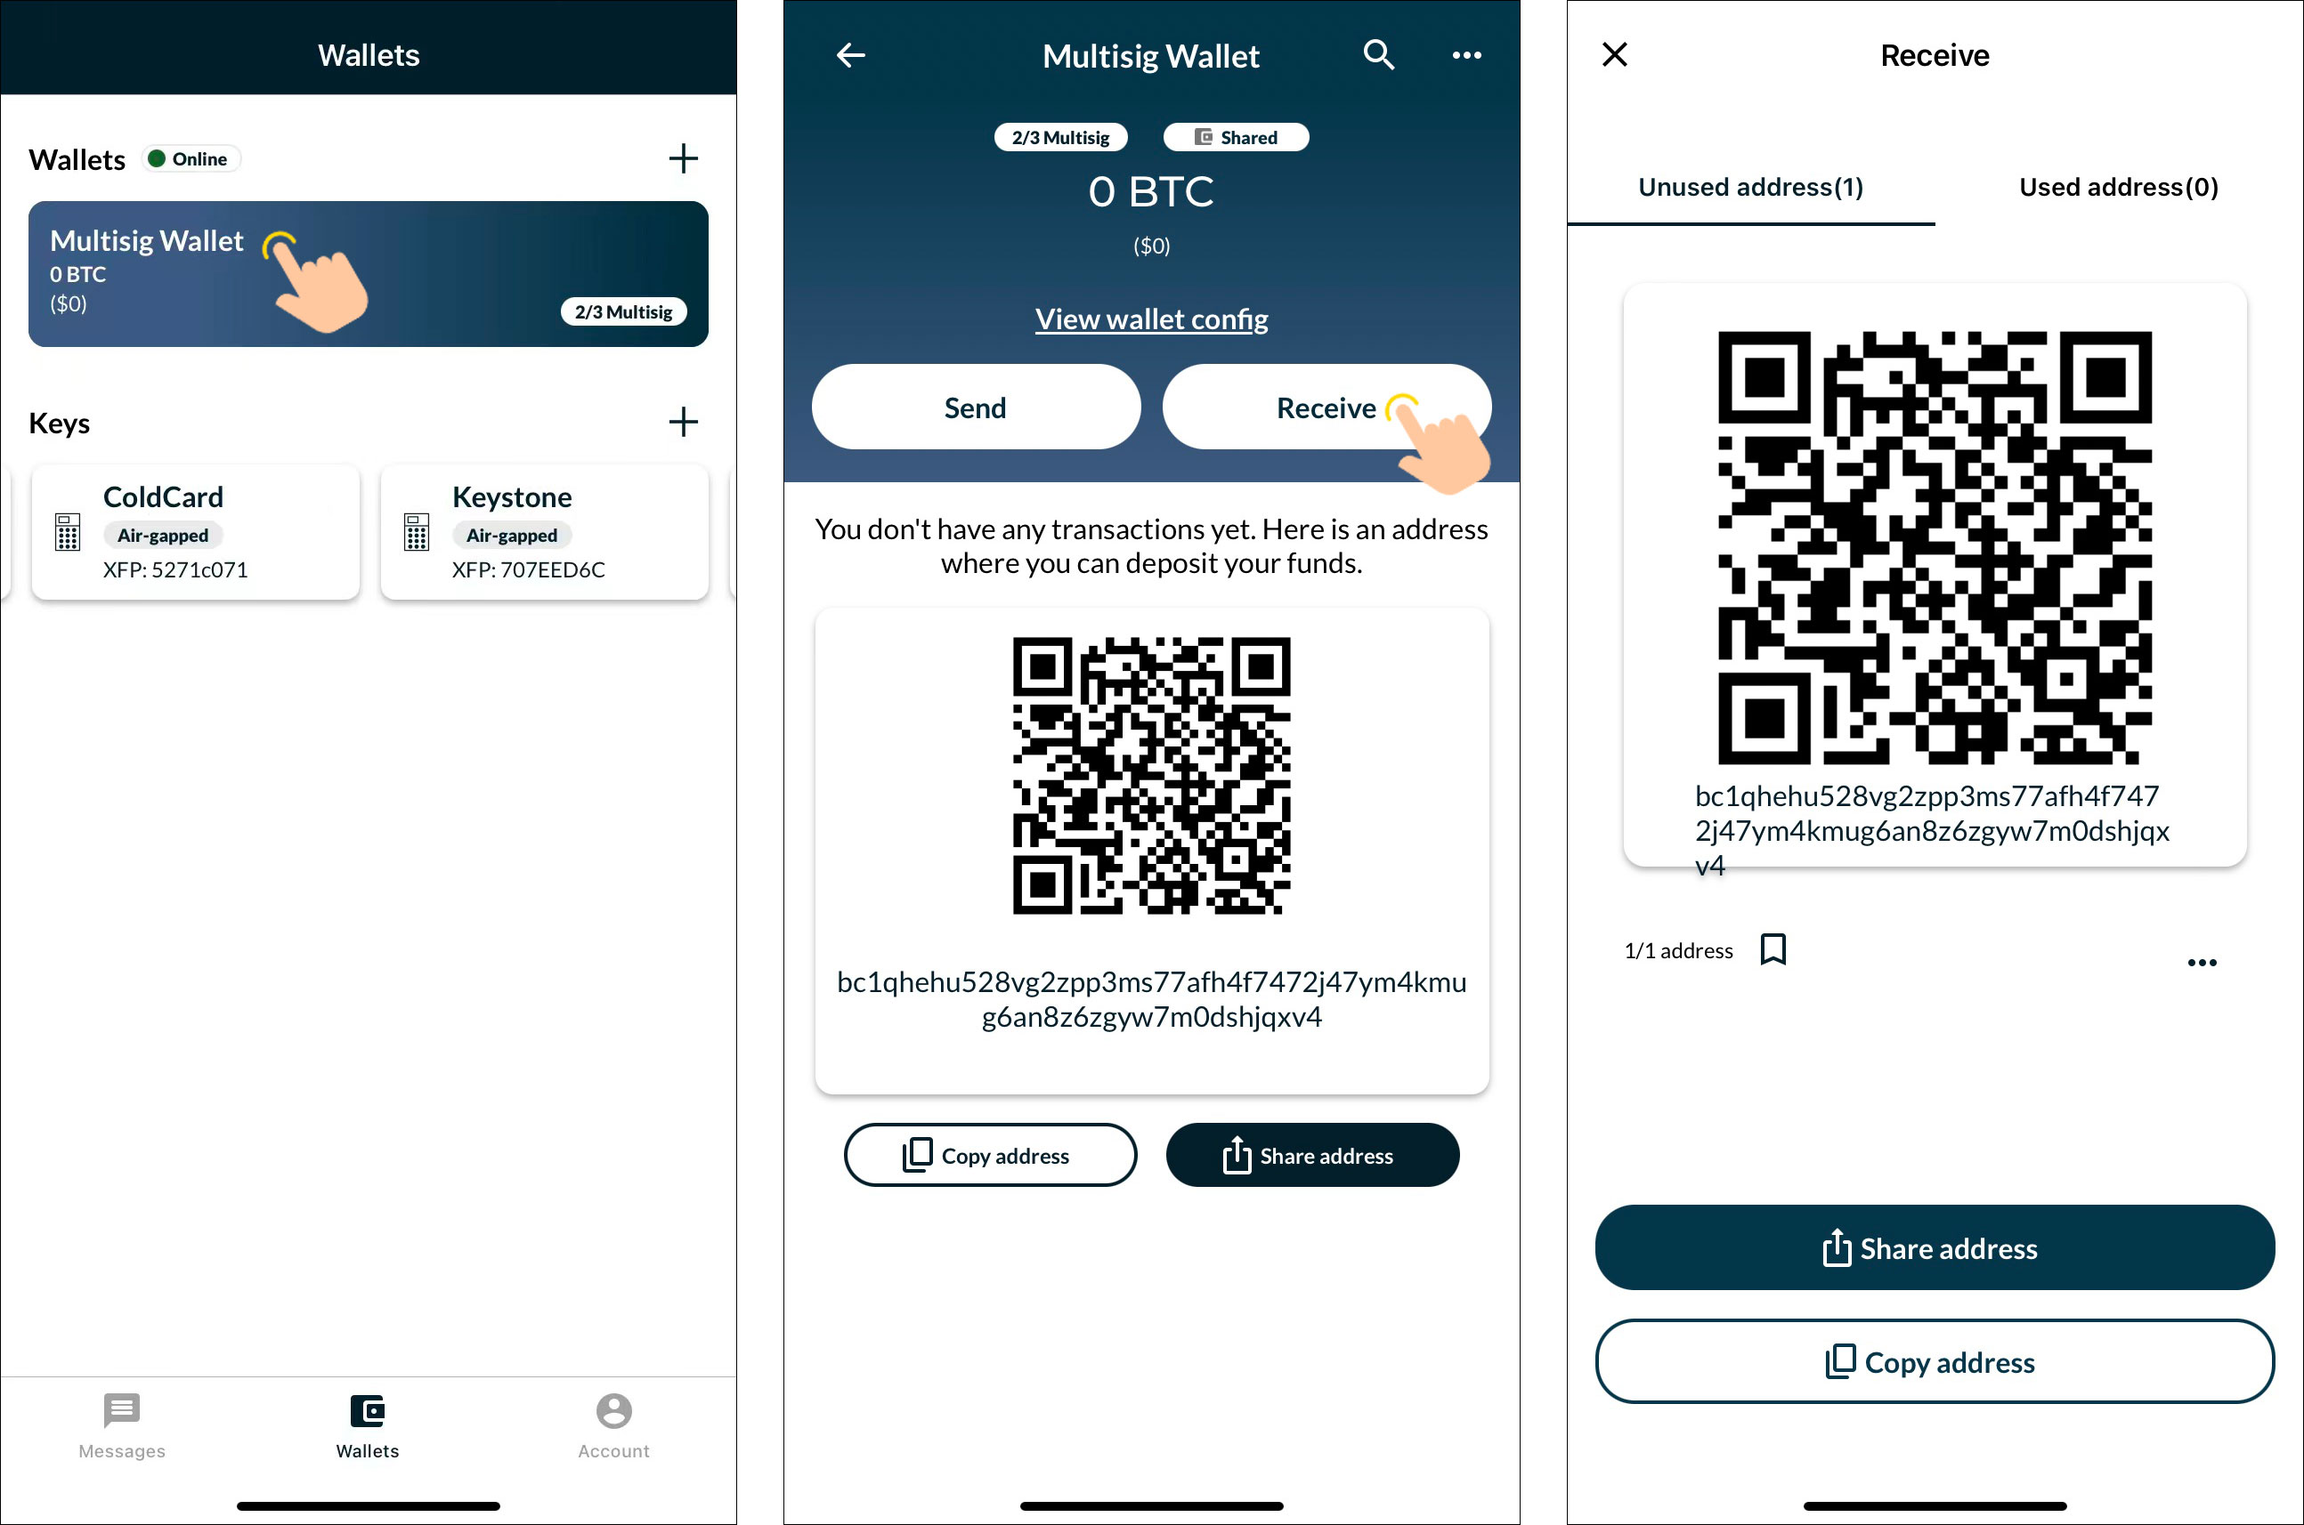
Nunchuk:
Select the corresponding multi-signature wallet, click [Receive], and display the receiving address to the sender.
Send a 2/2 multi-signature transaction
This chapter will demonstrate how to send a 2/2 multi-signature transaction on Nunchuk in a testnet environment. The currency issuance operation in the main network environment is the same as that in the test network.
1. Create a 2/2 multi-signature transaction on Nunchuk
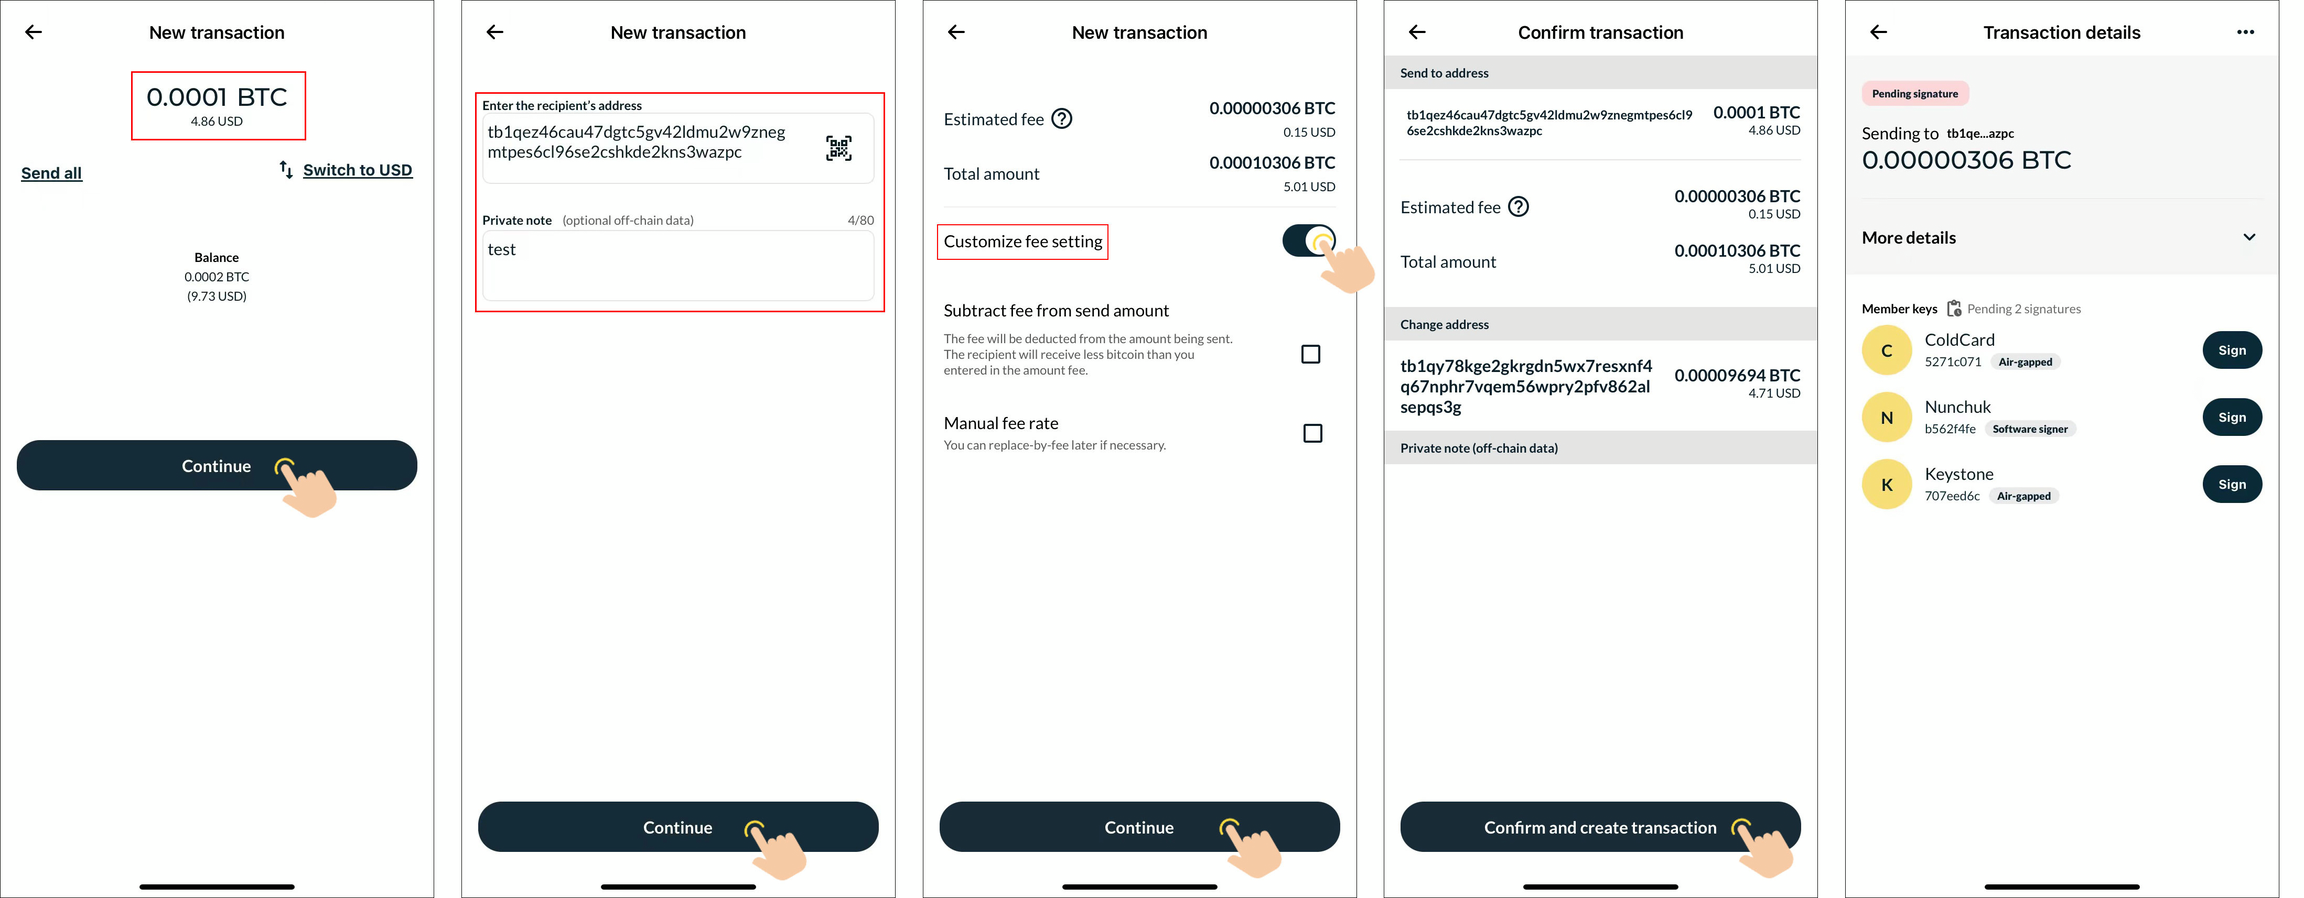
Select the corresponding multi-signature wallet and click [Send] to enter the currency issuance interface.

For setting the transaction amount, click "Continue," then set the receiving address and optional note, and click "Continue" again. Customize the transaction fee if needed, and click "Continue." After verifying the transaction details, click "Confirm and create transaction" to proceed to the signing page.
Security Note: To protect your assets, we recommend comparing the address displayed in Nunchuk with the address generated on your Keystone 3 Pro device after the connection is complete, and making sure the two addresses match exactly. Also, do not scan any external QR codes that were not generated by your Keystone device.
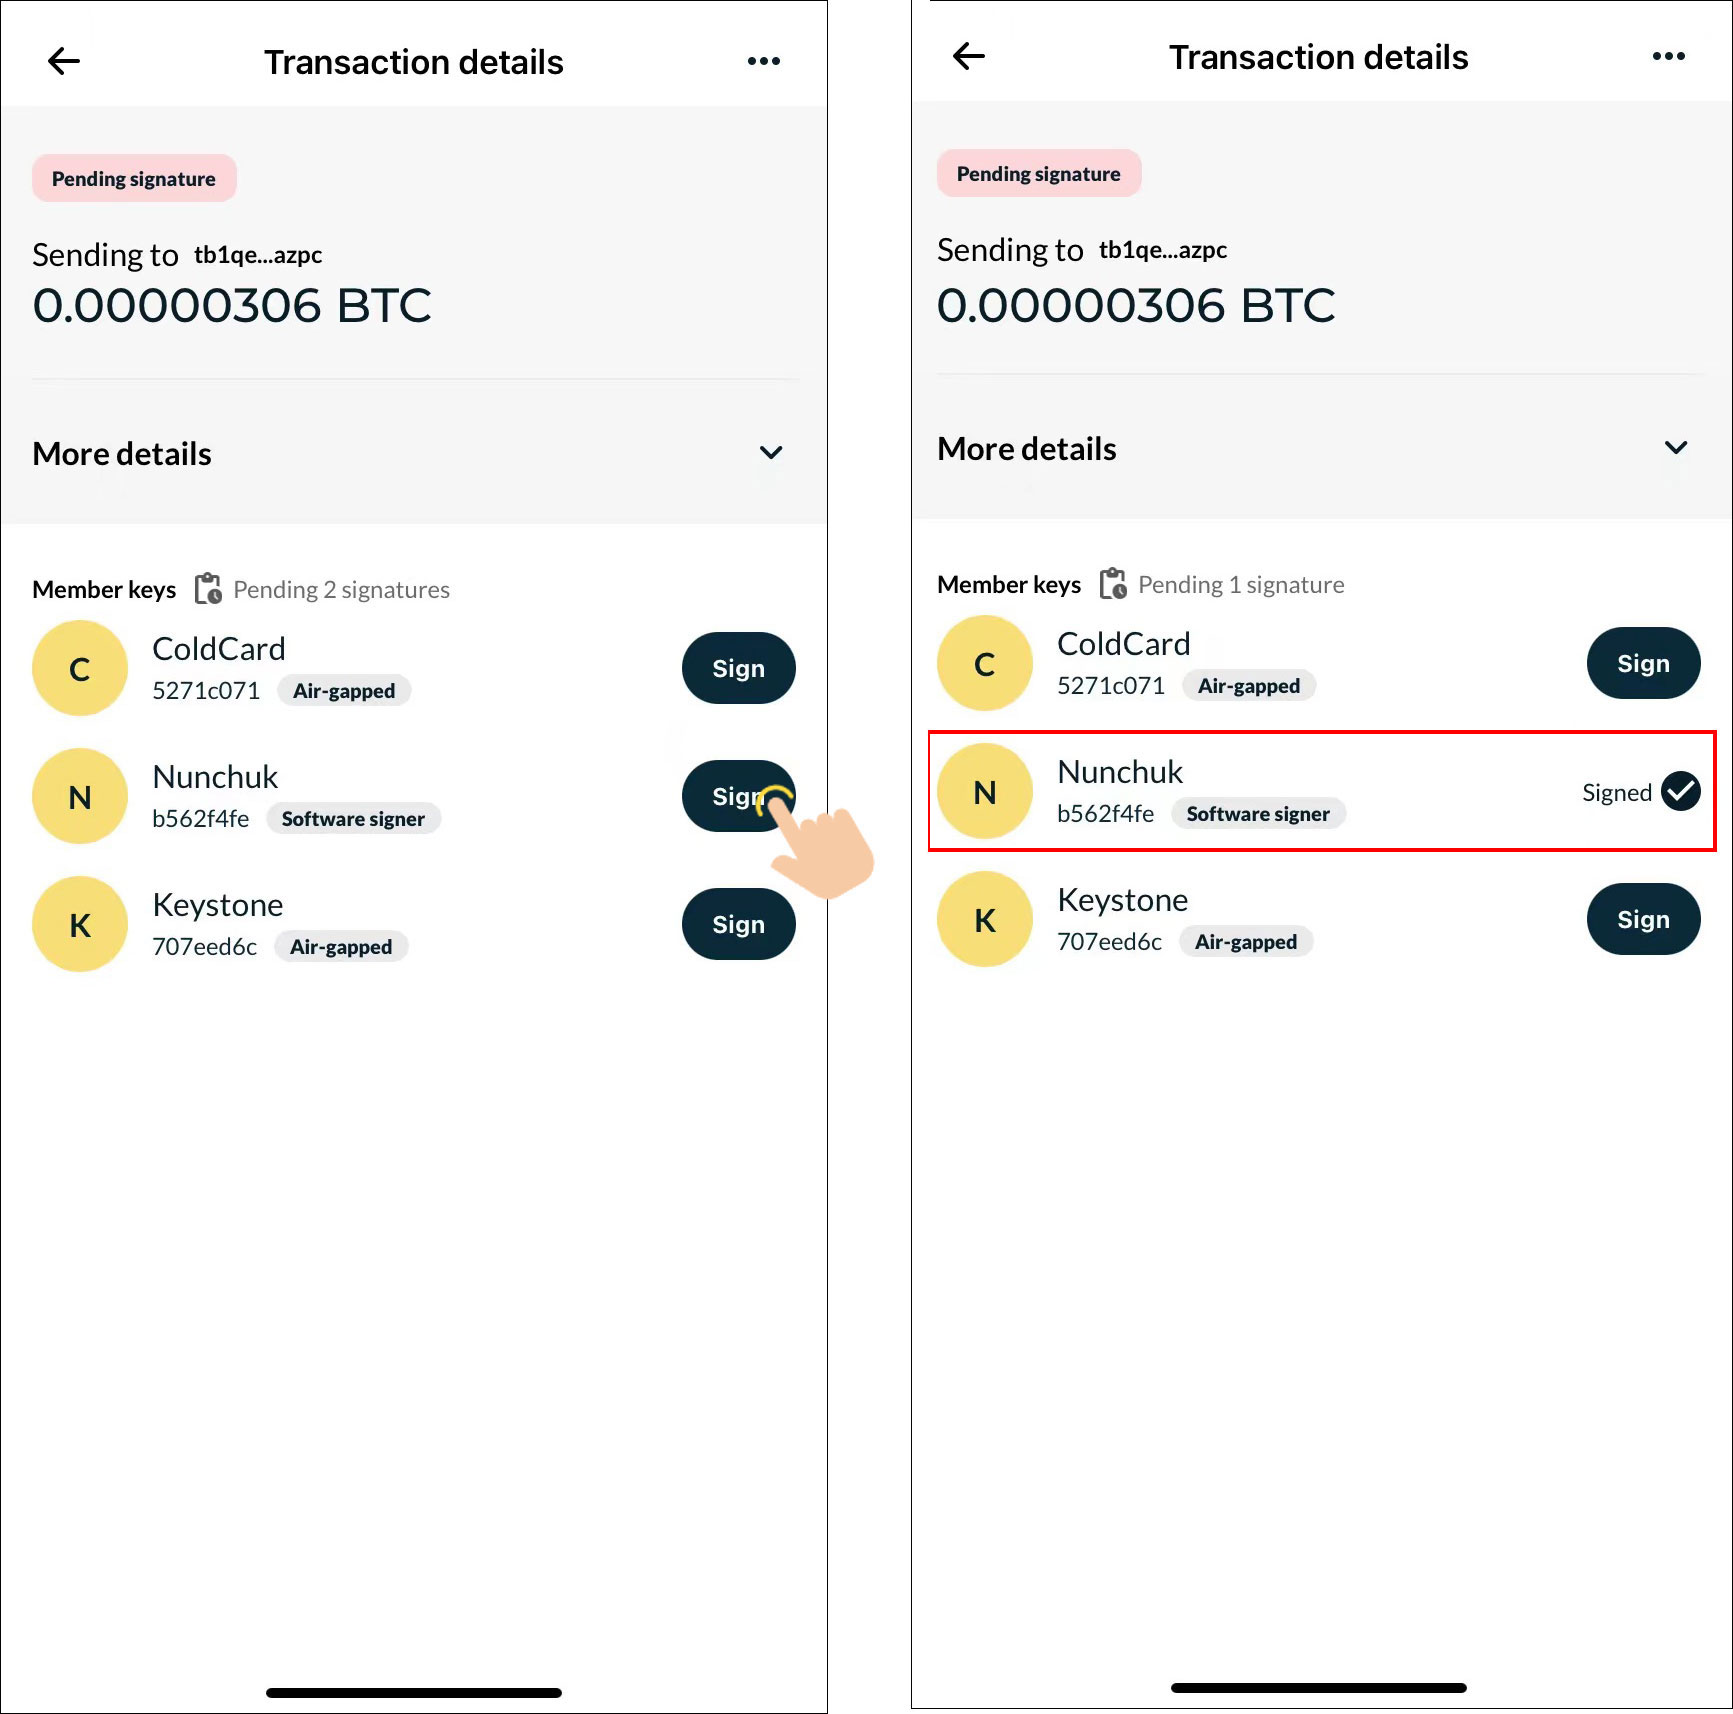
2. For multi-sig transactions signing:
Click the "Sign" button next to the software multi-sig party (for example, the software wallet named "Nunchuk" in this tutorial). Nunchuk will automatically complete the first signature.
Click the "Sign" button next to "Keystone," then "Export transaction," and Nunchuk will display the partially signed transaction as a dynamic QR code.

In the multi-sig wallet, tap the "Scan" button at the top right of the page, and scan the dynamic QR code displayed by Nunchuk.
Verify the transaction details, click "Sign," enter the password/fingerprint for authentication, and Keystone will display the transaction data for broadcast as a QR code.
On Nunchuk, tap the "←" button at the top right of the screen, then "Import signature," scan the dynamic signed transaction QR code displayed by Keystone. Once scanned, the second multi-sig party completes the signature.
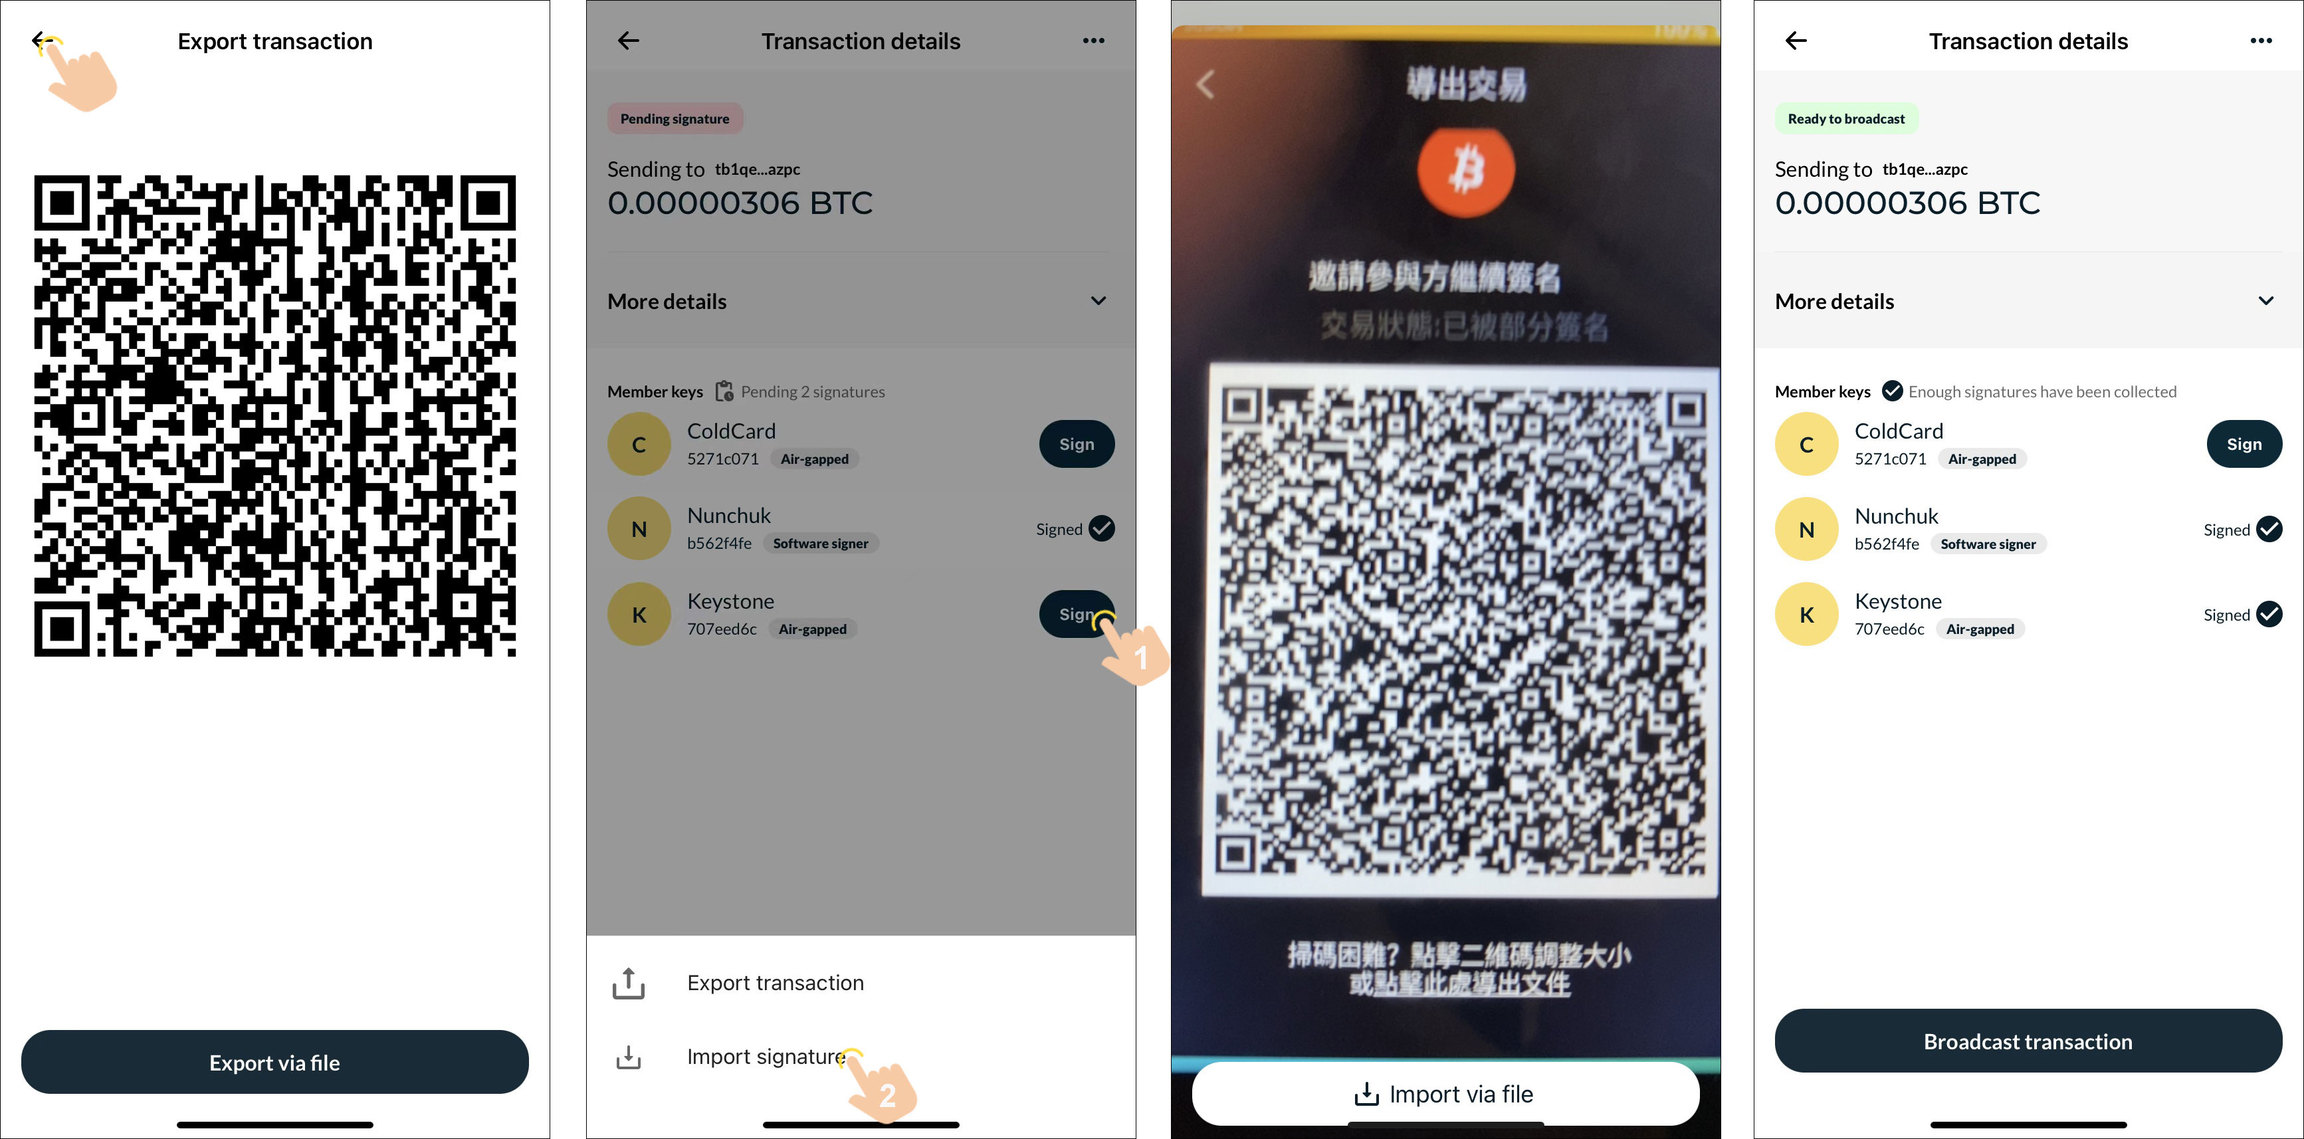
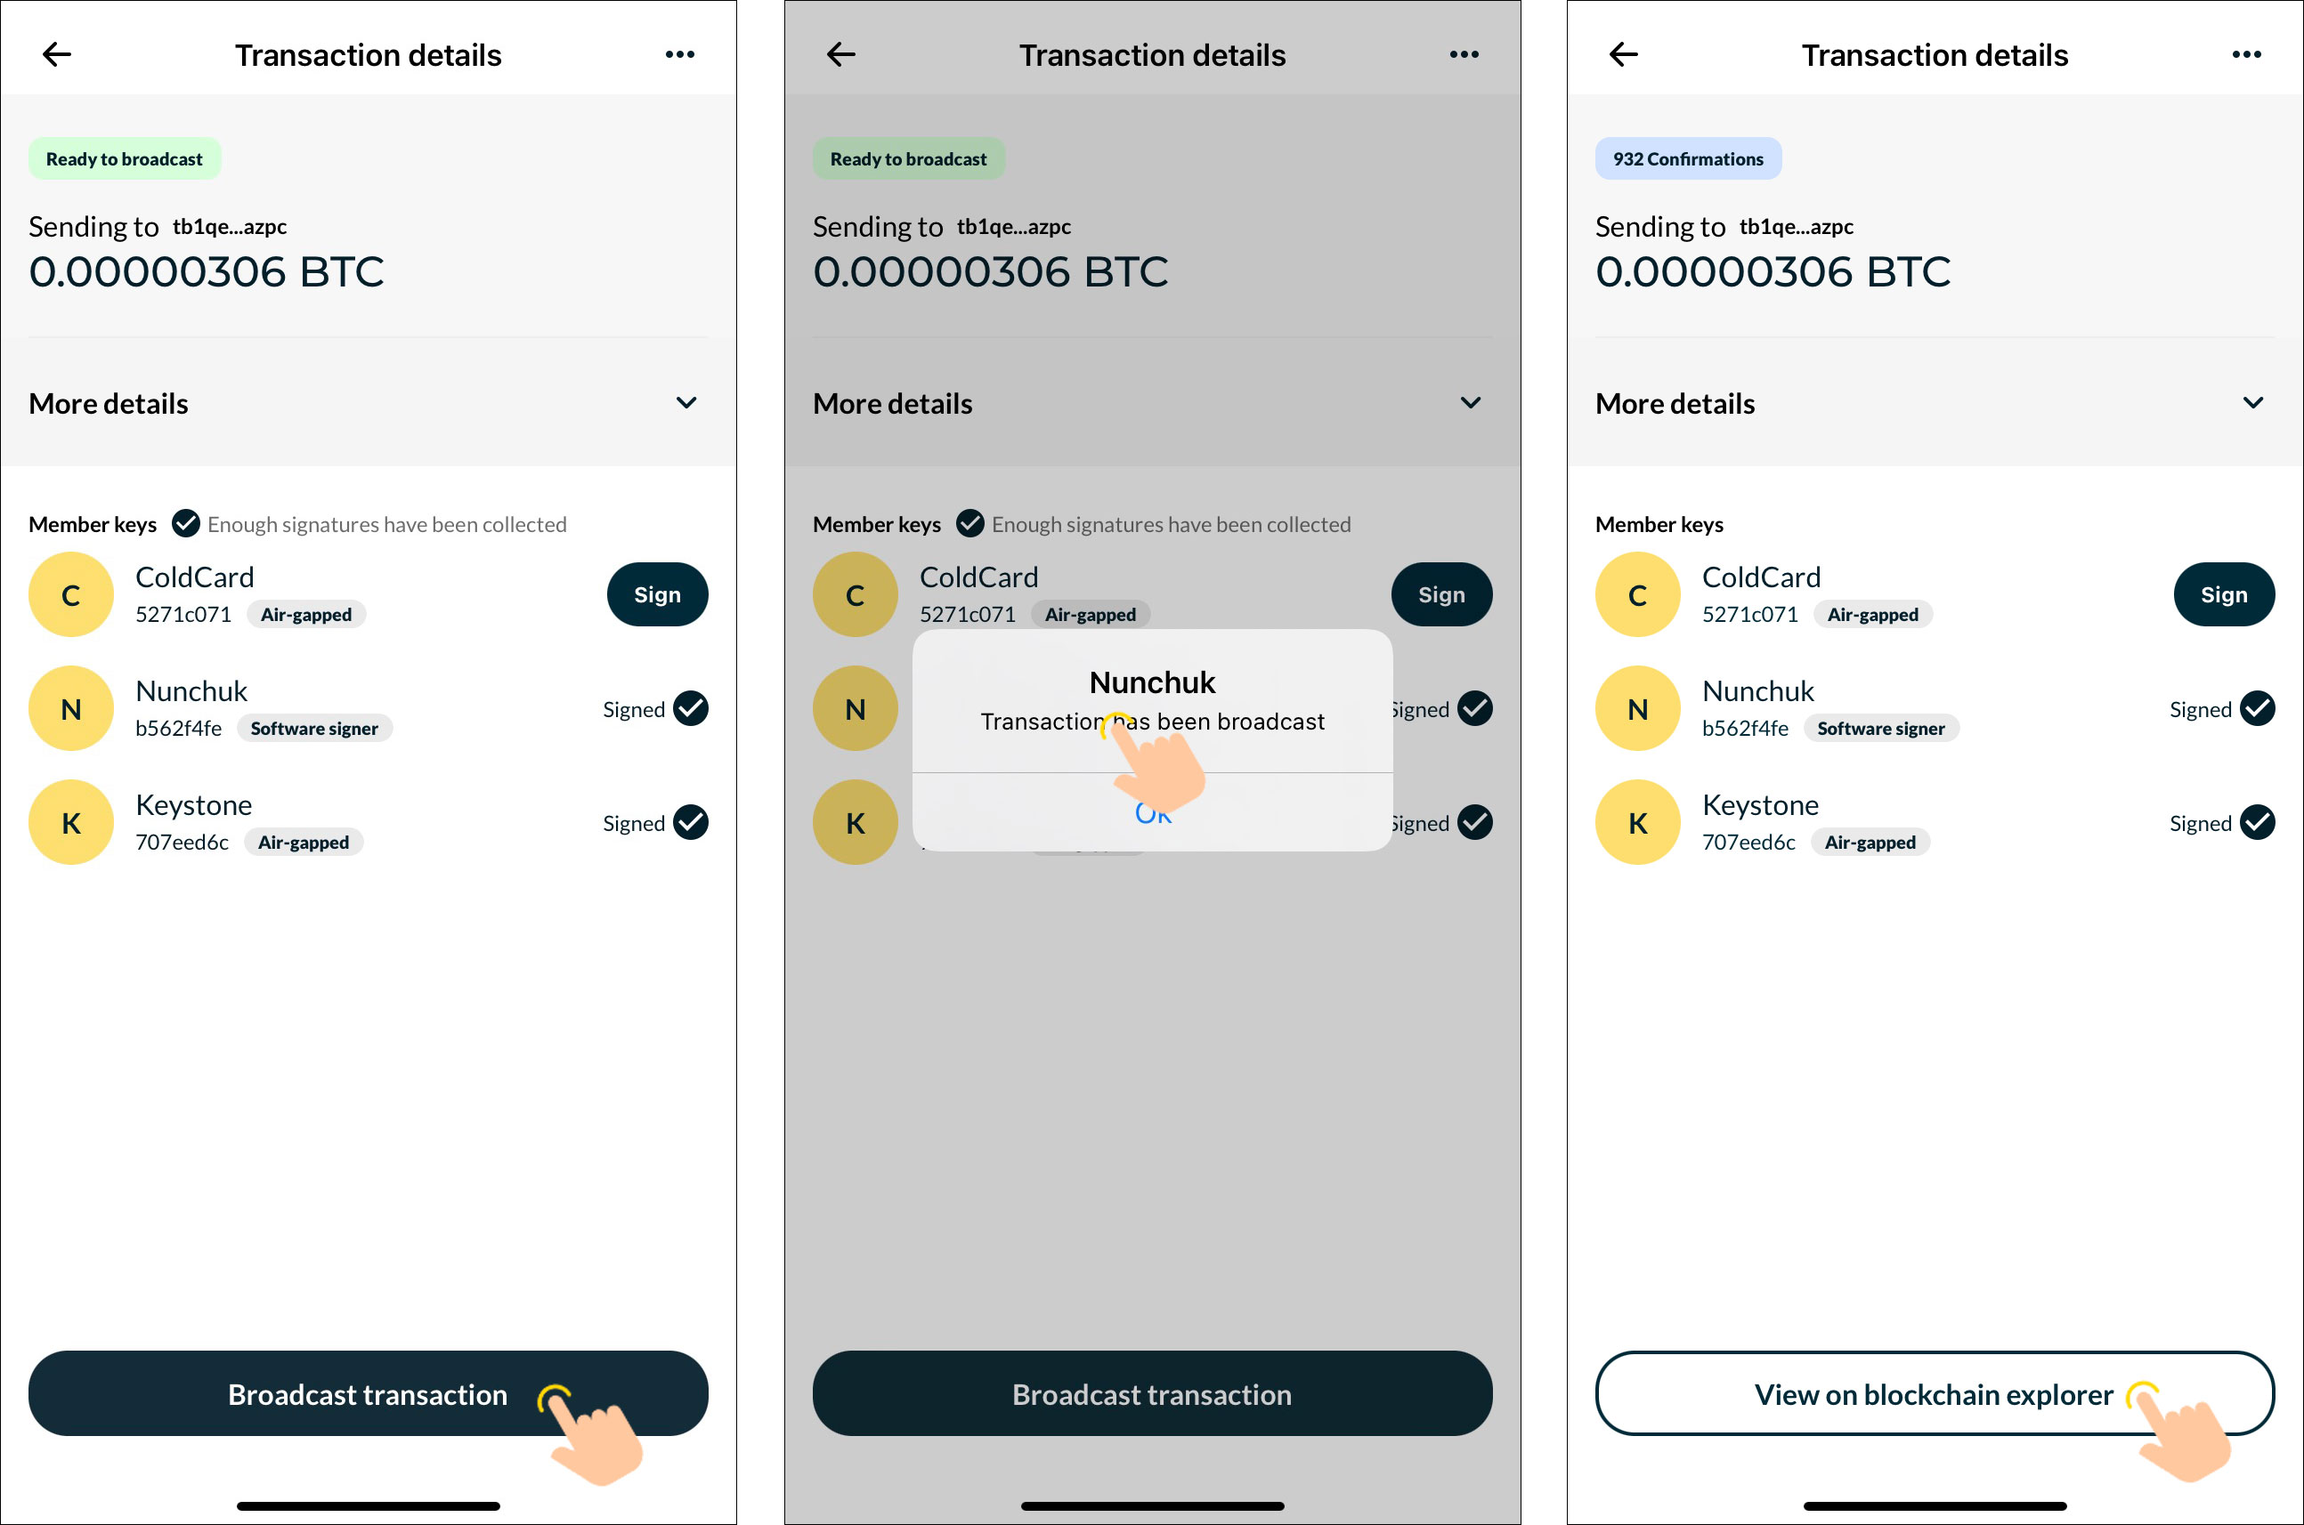
3. To broadcast the transaction on Nunchuk:
After the signature is completed, click "Broadcast transaction" to broadcast. After broadcasting, the transaction status can be checked on the blockchain explorer.